The Epic 2021 YouTube Video Marketing Guide for Bloggers
Source : The Epic 2021 YouTube Video Marketing Guide for Bloggers
Published On : June 08, 2021 at 04:43PM
By : Ankit Singla
In the competitive blogging industry, you can’t afford to stay in your comfort zone.
It’s time to put your creative mind at work.
Leverage new content formats, publishing platforms, and distribution channels to widen your traffic generation streams.
That’s why I decided to sit down and write this guide on the basics of YouTube marketing.
Table Of Contents
- 1. Why Do You Need a YouTube Channel?
- 2. How to Drive Traffic to Your YouTube Channel
- 2.1 Optimizing Your YouTube Channel
- 2.2 Investing in Your Video Recording Equipment
- 2.3 Creating User-Oriented Videos
- 2.4 How to Edit Your YouTube Videos
- 2.5 Optimizing Your YouTube Videos
- 2.6 Ways to Get More Views in Your YouTube Videos
- 3. Conclusion
How YouTube Marketing Works
How exactly does YouTube video marketing work?
I also asked myself the same question when I was thinking of getting some juicy YouTube traffic.
If you look at the big picture, YouTube video marketing seems rather straightforward. You create your own YouTube channel, upload videos, promote, get some views, and earn subscribers.
Once you’ve built up your channel, you can implement strategies that will send viewers to where you want them. It can be your blog, social media channels, or any platform where you turn traffic into money.
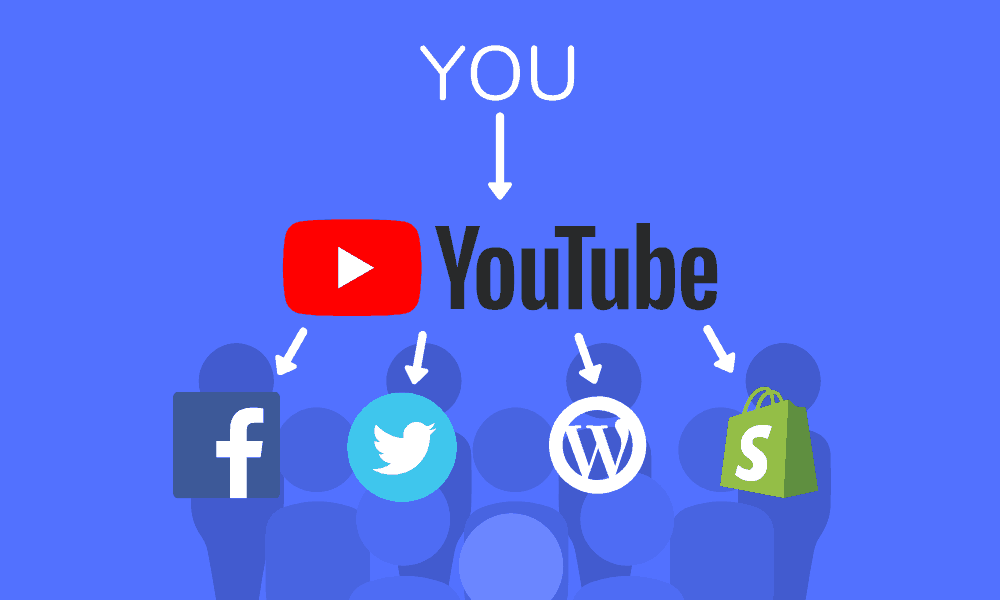
Simple, right?
Well, the parts where you create your channel page, record videos, and promote can get quite tricky.
Don’t worry — you will learn everything you need to know as you read this guide.
But first, allow me to address another question that some of you might be asking:
Why do You Need a YouTube channel?
“Running a blog is hard enough. Is investing time, money, and effort into a YouTube channel really worth it?”
Here’s the thing: we live in an era of blogging where written content is no longer enough.
With so much content being published daily, you need to expand your content strategy to get noticed.
Videos, in particular, are proven to work exceedingly well in popularizing a blog.
Don’t believe me? Perhaps these blogging statistics will convince you:
- High-income bloggers are 4.5 times more likely to use videos
- A video can help blog posts earn 3 times more links
- Videos can increase your blog traffic by up to 3 times
By uploading videos on YouTube, you also leverage the platform’s massive user base to maximize your content’s exposure. At the same time, you give yourself the chance to gain subscribers and establish your authority on the platform.
Think of your YouTube channel as a reliable source of quality traffic.
If these viewers subscribed to you, they must already trust you.
That means it’s easier to convince them to buy something from you or click your affiliate links.
The catch is, you need to outperform a lot of YouTube creators to make it to the top.
You’ll have to work hard, aim high, and learn a new set of skills to make your efforts pay off.
In the end, challenges will help you gain the skills and qualities required to succeed as a blogger.
Other than building your authority and getting quality traffic, here are five more benefits of YouTube marketing strategy:
- YouTube can be monetized directly — YouTube videos can be monetized through affiliate links, in-video ads, direct product promotions, and donation platforms. The more views you get, the higher your YouTube channel’s profitability becomes.
- You can reach a global audience — By now, you should know that YouTube rakes in billions of views from across the globe daily. It’s a great platform if you’re targeting the global audience.
- It’s free — Did I mention that using YouTube to spread your videos is completely free? Unless, of course, if you decide to promote your channel through ads.
- Take advantage of user intent — By creating review videos of your affiliate products, you can attract viewers with purchase intent. This means they’re more likely to click on your affiliate links — rewarding you with sweet commission dollars.
- Build your network — Becoming an established YouTuber is like joining a community of influencers and trusted brands in your niche. It opens up collaboration opportunities that can cement your own brand’s credibility and trustworthiness.
How to Drive Traffic to Your YouTube Channel
Now that we’ve covered the “whats” and “whys” of YouTube marketing, let’s jump into the “hows.”
Here are the really important things you can’t miss:
Optimizing your YouTube channel
Creating a YouTube channel is similar to building a blog.
Everyone can do it, but not everyone does it right.
Before you worry about strategies to get YouTube traffic, start by optimizing your channel first.
Here are the most important YouTube channel optimization strategies that experts agree on:
1. Use customized channel banner art
A custom banner art on your YouTube channel lets you give a strong first impression to viewers.
It makes your channel appear more legitimate and professional. You can also communicate your brand’s vision through your banner art — letting visitors know what you’re all about.
For your reference, here’s a screenshot of my official YouTube channel’s banner art — a simple, motivational quote for aspiring bloggers:

Below are a few quick tips on how to create the perfect banner art for your YouTube channel:
- According to Google’s guidelines, the recommended size of your channel’s banner art is 2,560 x 1440 px.
- Make it detailed, but it shouldn’t exceed 6MB in size.
- If you’re active on social media, include your social media handles and page URLs.
- You can also type in your website’s address to make it easier to remember.
2. Add social media links to your banner
While inserting social media handles and URLs is a nice touch, they shouldn’t replace proper, clickable links on your banner.
You can do this using the built-in feature on YouTube. To begin, head over to your channel and click ‘Customize Channel.’

From there, switch to the ‘About’ tab to access the settings you need.
At the bottom of the page, you should see a ‘Links’ button with a “plus” icon to the left. Click it to start adding social media links to your banner.

Under the “Custom Links” section, fill in the fields with each link’s title and URL. When done, click ‘Add’ and then save your changes by clicking ‘Done.’

Repeat the steps above for each social media link you wish to add. YouTube will automatically display the corresponding icon for the site you entered.
By clicking ‘Done,’ you should immediately see the links added to your YouTube channel banner.

3. Write a meaty “About” page copy
Right after you insert links in your banner, write a solid channel description for your YouTube channel.
The button you need is located directly above the “Links” section.
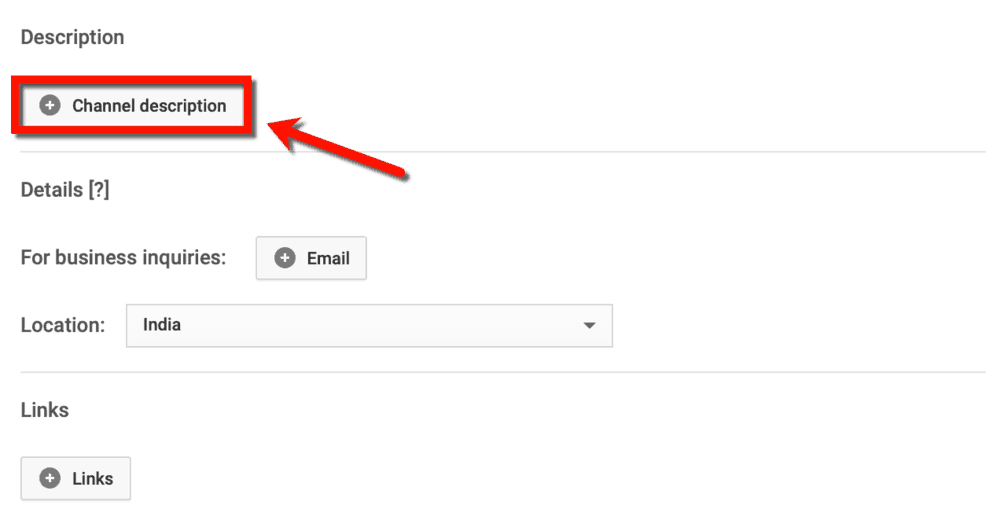
Your channel’s description is limited to a maximum of 1,000 characters.
That’s only around 150 to 165 words long.
Here are a few tips that will help you maximize your YouTube channel description:
- Use casual language — In your channel description, there’s no room for fancy words and complicated sentences. Just write each and every sentence as if you’re having a casual conversation with your audience.
- Start strong — Go ahead and introduce your channel’s goal in the first or second sentence of your description. You can tell a short story about your brand once your audience understands why your channel exists.
- Insert links and CTAs — 165 words is way too short to write everything you want your viewers to know.
While you’re at it, remember to enter your email address for potential partner brands who may have business inquiries. Also, set your current location so local brands can know whether or not you’re a good fit for them.
4. Set your channel icon
By the time you create your YouTube channel, you should know that it uses the image on your Google account.
That means you can edit your channel icon by changing the one already uploaded on your Google About Me page.
You can access your Google About Me page directly on YouTube if you so prefer. All you need to do is head back to the channel customization page and hover your mouse over your photo.
The ‘Edit’ button with a pen icon should appear on the upper-right corner.
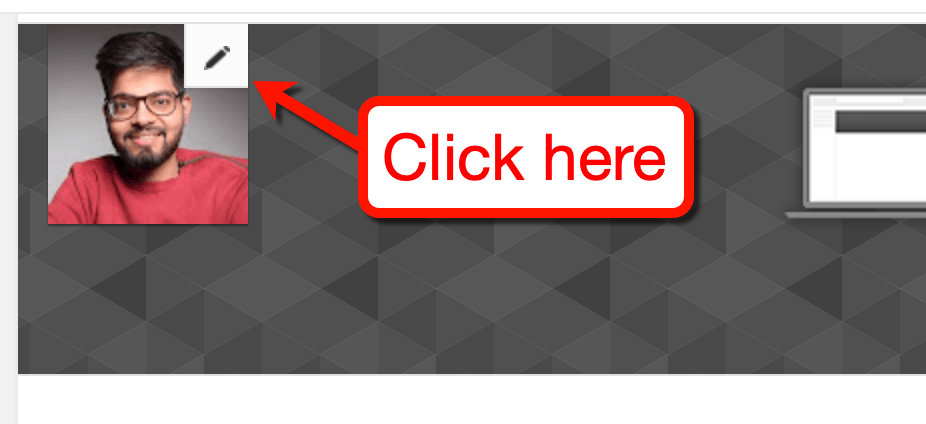
On the pop-up window, click ‘Edit’ to be redirected to your Google About Me page. That’s where you can select and save your new channel icon within seconds.
Remember the following tips when setting a new channel icon:
- The recommended size for your channel icon is 800 x 800 px.
- You can only use JPG, GIF, BMP, and PNG files. However, GIF animations won’t work.
- Whatever you, don’t use copyrighted images as your channel icon.
5. Choosing your channel trailer
YouTube allows you to choose or “pin” two videos on your channel’s “Home” page.
One will appear to newcomers while the other will only be visible to existing subscribers.
To set the videos you want to use, open your channel customization page and switch to the ‘Home’ tab.
You should see two additional tabs labeled “For returning subscribers” and “For new visitors.”
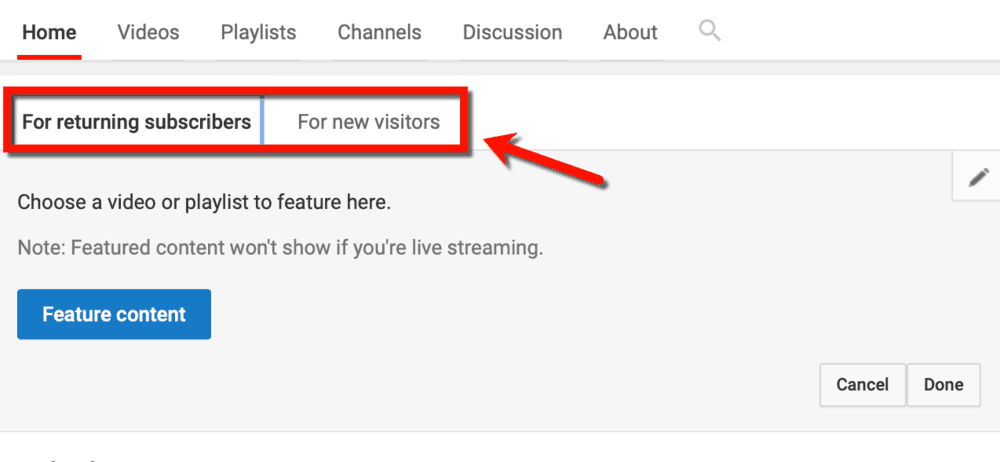
The video meant for new visitors is referred to as your channel trailer.
As the name suggests, it should be a video that explains what your channel is about. As such, it must be short, to-the-point, and captivating from the get-go.
The process is actually quite similar to writing an “About Me” page. The copy must show personality and highlight the values you offer.
More importantly, it should start with a “hook” that will compel viewers to watch to the end.
A great example would be Neil Patel’s channel trailer where he talks about what he does three seconds in.

As for your channel trailer’s description, you need a paragraph that will help viewers and YouTube’s algorithm determine its relevance. You can do so by editing the video’s details upon upload or via your YouTube Studio dashboard.
YouTube video descriptions can be up to 5,000 characters long, but it’s best to keep it 100 words or below. This makes sure that the full description appears on the video’s preview.
Remember to include links to your blog and social media accounts. These links are vital if you want your YouTube marketing strategy to pay off.
6. Choosing your featured content
Next up, you must set a featured video that will appear on your YouTube channel’s home page to existing subscribers.
The only rule here is to choose a video that you consider as the best example of your channel’s content.
For example, if you’ll focus primarily on product reviews, feature your video about your top affiliate product. But if you publish a lot of inspirational videos, feature the one where you talk about your brand’s core message.
Above all, your featured video must be the one that provides the most value to your target audience.
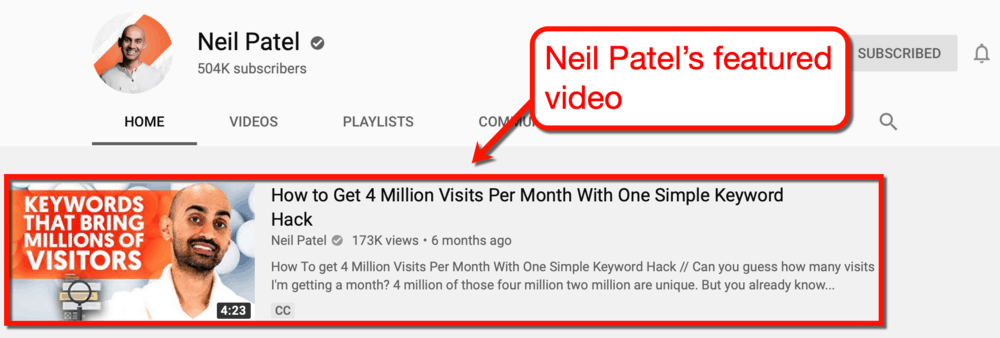
Neil Patel, for one, features a video about a tactic that delivers the most results with the least effort.
7. Select SEO tags for your featured content
Before we move on to the next step in optimizing your YouTube channel, let’s talk about YouTube SEO tags.
These pertain to a form of meta data that can boost the searchability of your videos for specific queries.
Sure, SEO tags are no longer as effective in ranking for YouTube search results. However, they can help your videos appear on the “Recommended Videos” section.
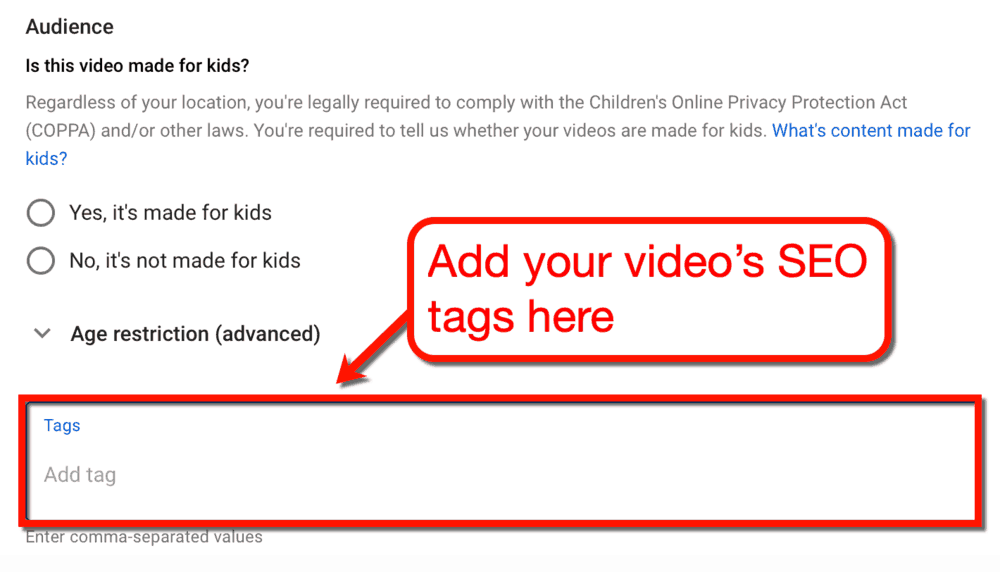
SEO tags can be added via your YouTube Studio page. Just edit the details of your featured video or channel trailer and scroll down until you reach the “Tags” field.
We will talk more about YouTube SEO tags later. For now, let’s finish optimizing the rest of your YouTube channel.
8. Link your YouTube channel with Google Analytics
What’s that — you haven’t configured your Google Analytics account yet?
If so, then you’ll miss out big time on optimization opportunities that will grow your online presence.
To link your YouTube channel with Google Analytics, you’ll need to generate a unique tracking ID for it.
I won’t delve too much in the nitty-gritty of this process. For that, I suggest you check out this guide instead.
Basically, you need to enter your channel’s URL when creating a new property. You should also enter your YouTube channel’s name as is to help you find it later.

Don’t know where to find your YouTube channel’s URL? Just head to your main channel page and copy the URL from your browser’s address bar.
When doing so, don’t copy the “https://” part and all the characters starting from the question mark.
Refer to the screenshot below to know the specific URL parts to copy for your Google Analytics property.

After plugging in your channel’s name and URL, set your industry category and reporting time zone. When done, click ‘Create’ to generate the tracking ID for your YouTube channel.
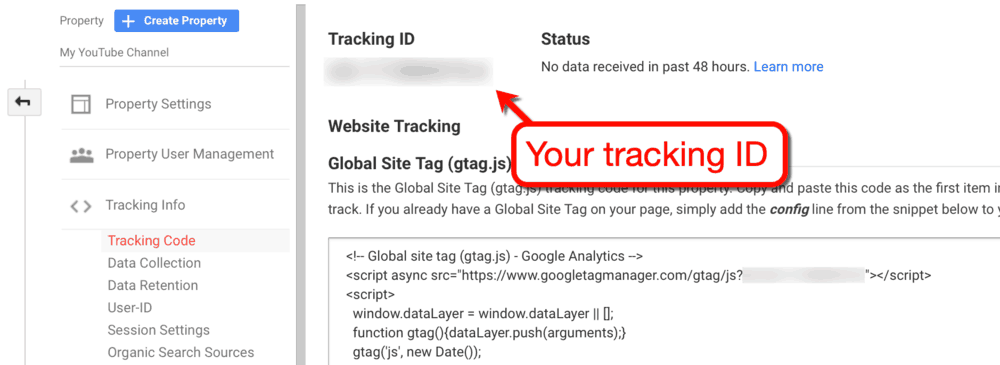
The tracking ID will be used to verify your ownership of the property. In this case, it’s your YouTube channel.
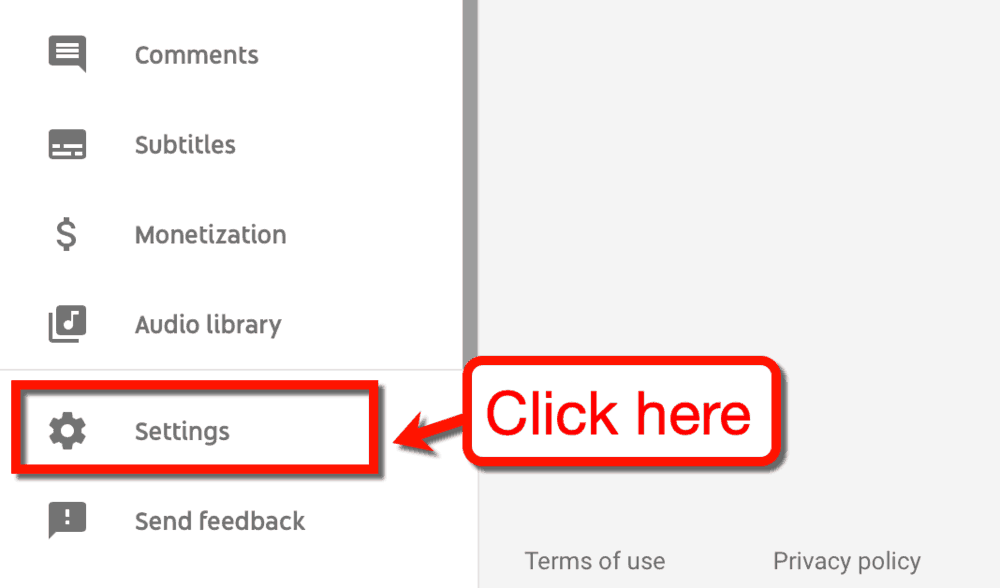
Once you have it, head to your YouTube Studio page and click ‘Settings.’
On the settings window, click ‘Channel’ and then proceed to the ‘Advanced settings’ tab.
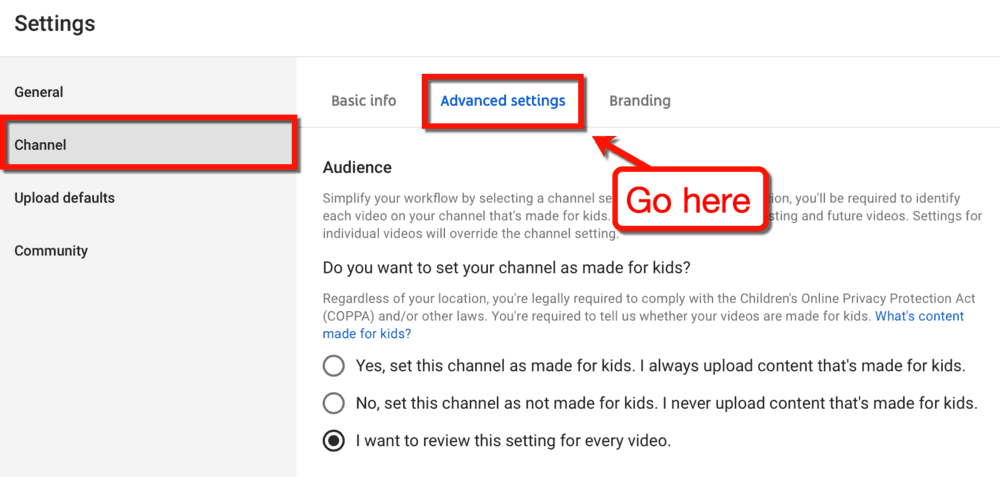
Lastly, scroll down to the “Other channel settings” section and click ‘Advanced channel settings.’ This will lead you to your YouTube account’s management side of things.
The last step is to paste your tracking ID into the “Google Analytics property tracking ID” field.
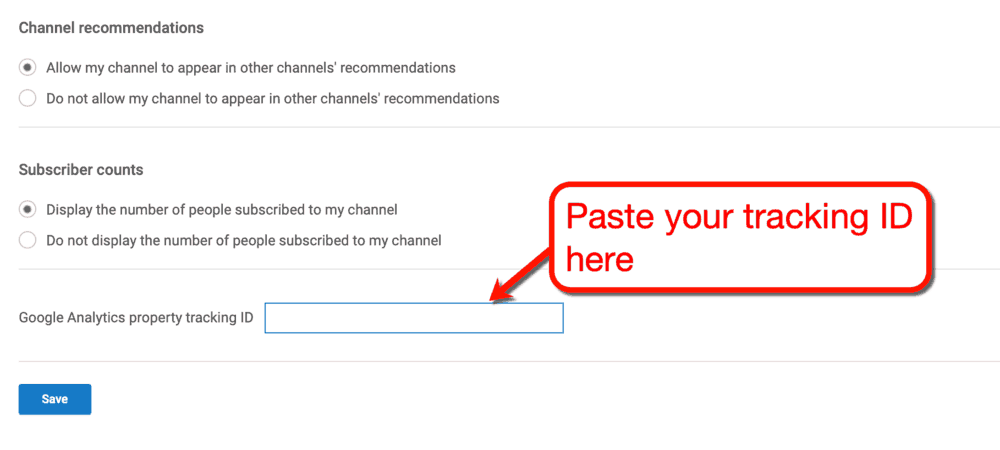
Click ‘Save’ to complete the link between your YouTube channel and Google Analytics account. All you need to do now is give Google Analytics up to 24 hours to get your channel’s data.
Great — the software side of your YouTube channel is all set!
Right now, you’re technically capable of uploading videos to your YouTube channel for the public to see. But to make sure you make an impactful presence on the platform, you need to pay attention to your hardware.
If you agree, then let’s talk about your video recording equipment.
Investing in Your Video Recording Equipment
Let’s face it — you need quality equipment if you want to make quality YouTube videos.
Some YouTubers swear that you can start and run a YouTube channel using only your smartphone.
That should be fine if you’re early in the process of brand building. But if you already own a blog and want to compete against other brands, you’ll need to try harder.
More specifically, you need to answer key questions like:
- What type of camera will you use to record your videos?
- Where will you record your videos?
- Who will edit your videos and how will it be done?
- How will I manage my budget on my video recording equipment assets?
To help you answer these questions, let me help you take a systematic approach.
First of all, let’s decide the type of camera you’ll use for YouTube video creation.
Deciding what camera to purchase
For most bloggers who want to run their own YouTube channel, there are two common choices:
- A basic, point-and-shoot camera
- A professional DSLR camera (Digital Single-Lens Reflex)
For most bloggers, the first choice is unquestionably more practical.
There is a range of high-quality, point-and-shoot cameras out there with varying features.
Some have flappable LCD monitors that will help you film by yourself. Others have optical viewfinders to help your cameraman shoot clips in bright environments.
Regardless, it’s important that you identify your goals, do your own research, and compare products online. I recommend looking at in-depth reviews on YouTube to help you make the right investment.
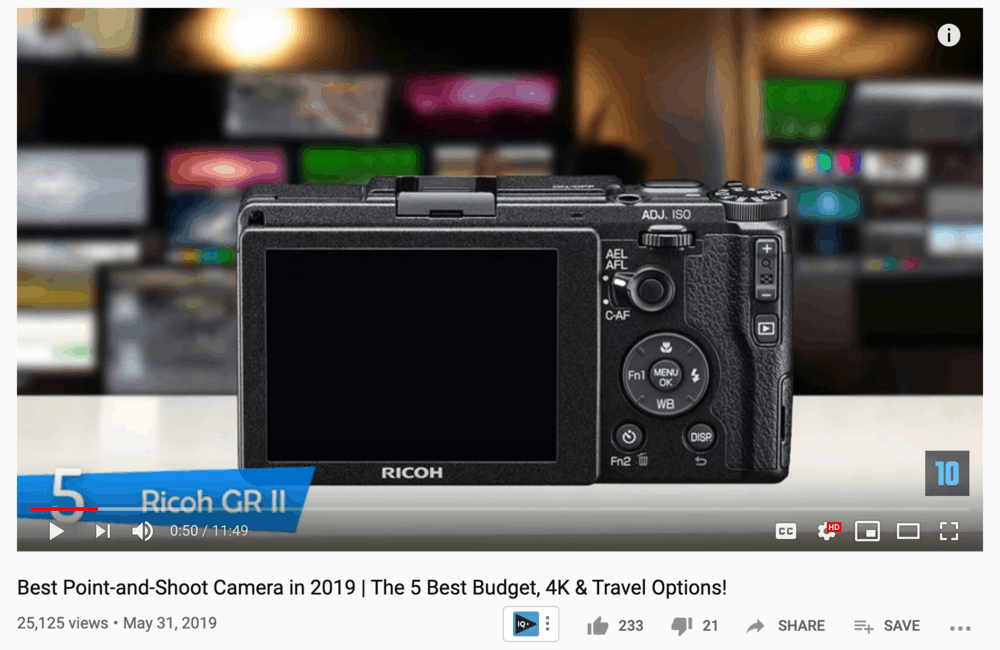
Overall, you should expect to spend anywhere between $400 and $700 for a point-and-shoot camera — no more than $1,000.
A DSLR camera, of course, leads to much higher overhead. In turn, you can get the best quality picture possible for your YouTube videos without a professional camera crew.
However, you need to know that there using a DSLR camera for video capture has a somewhat high learning curve.
Sure, most people can probably pick up a DSLR camera and capture videos with it out of the box. But in order to maximize its features, you need to read the operation manual, experiment, and read online guides.
This buyer’s guide by ShotKit will help get the ball rolling with invaluable tips along with product comparisons. Just remember that a DSLR is a serious investment — be sure to check as many reviews and comparisons as possible.
Getting the right audio equipment
Unless you’re a travel blogger, you’re probably planning to record YouTube videos right at home.
This leads to two unmissable factors in setting up a home recording studio — sound and lighting.
Believe it or not, a video’s sound quality is often deemed more important than lighting.
The thing is, YouTube viewers can live with a less-than-sharp picture, but terrible sound quality can ruin the whole experience.
Most of your YouTube video’s information, after all, will be delivered by sound.
To make sure viewers can comprehend what you’re saying in the video, the first step is to invest in a high-quality microphone.
When it comes to recording YouTube videos, there are three types of microphones you can purchase right now:
- Shotgun Microphones — A shotgun microphone is commonly used by content creators for video commentaries and podcasts. They are directional and perfect for one-man YouTubers engaged in a wide range of video formats.
- Boom Microphones — A boom microphone is often attached to an overhead mount or a pole held by another person. It’s meant for capturing audio in scenes where multiple people are speaking.
- Lavalier Microphones — Lastly, a lavalier microphone can be clipped on to a person’s tie, collar, or shirt. As you may have guessed, it’s extremely useful if you’re shooting outdoors — conducting interviews, reviewing establishments, and so forth.
Again, you need to make your decision based on the type of videos you plan to record for your YouTube channel. Once you determine the type of microphone you need, spend some time watching video reviews and reading comparison posts.
If you’ll do most of your recording at home, you should also consider soundproofing your designated recording room.
Soundproofing isn’t really a requirement for new YouTubers, but it’ll definitely help their channels take off. Its benefits include muffling up external sounds, improving audio clarity, and making your recording room look more professional.
The downside is, soundproofing a room can take a couple of days to finish. Soundproofing may also come with a hefty price tag, especially if you choose to work with a soundproofing company.
A much cheaper option is to purchase individual acoustic channels and perform the soundproofing yourself. You can find these on Amazon with prices ranging from $15 to upwards of $50 for a bundle.

What about lighting?
The importance of lighting when creating YouTube videos is self-explanatory.
If you’re doing product reviews, good lighting makes sure the product’s aesthetics are given justice.
The same can be said if you’ll be speaking in front of the camera. With proper lighting, you can highlight your best features and everything else you want to show off in your background.
A “two-point” lighting system is perhaps the most common setup used by YouTubers. This involves the use of a “key light” as your primary lighting and “fill light” to reduce shadows.
It may all sound complicated, but these lighting components are relatively affordable.
On Amazon, you can pick up a decent fill light unit for around $30 to $60.
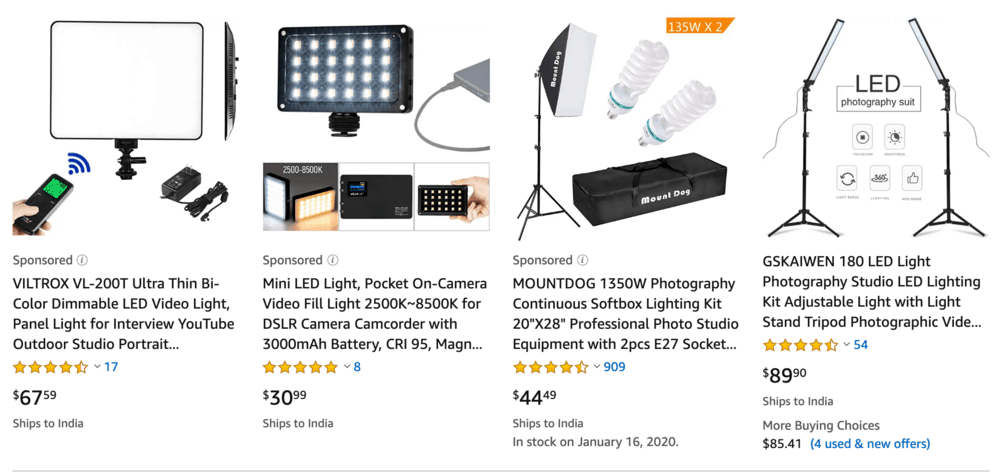
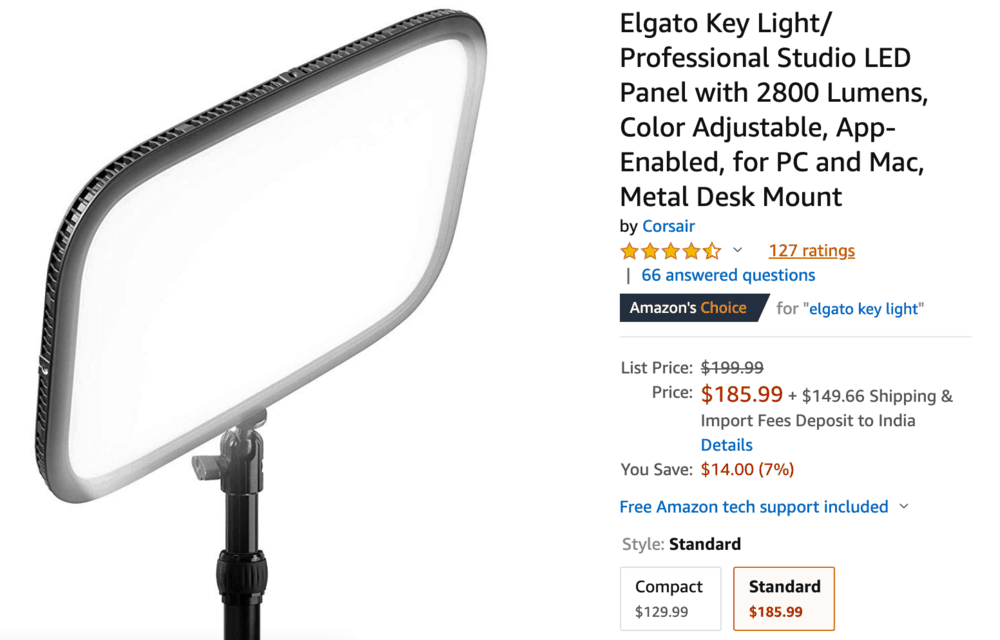
As for your key light, a popular option would be the Elgato Studio LED Panel — specifically designed for content creators. It goes for up to $199 on their website, but it’s often offered at a discount on Amazon.
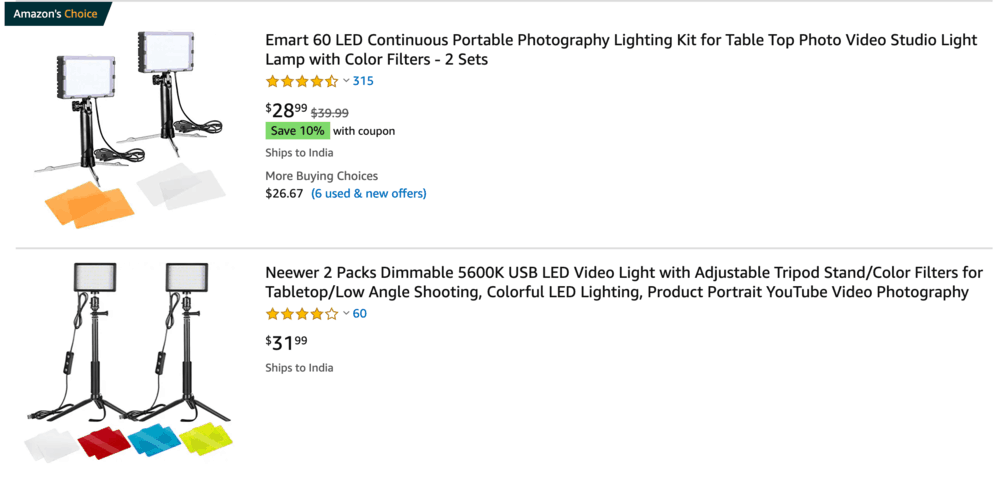
If you find the prices of these products steep, there are budget lighting systems out there for small YouTubers. A lot of new channels start with a modest, tabletop LED light unit that can provide sufficient illumination.
If you want an even cheaper lighting system, just roll up the curtains and shoot during the day. With the help of a reflector, you can achieve the effectiveness of a two-point lighting system at a quarter of the price.
Now that you can make your YouTube videos nice and bright, you’re just about ready to start recording.
Creating User-Oriented Videos
To be a profitable blogger, one of the realities you need to accept is that you’re not blogging for yourself.
If you want your blog content to receive traffic, you must write content with your target audience in mind.
The same goes if you want to create and publish YouTube videos. Instead of recording something just because you want to, you must consider how it will benefit your viewers.
With that being said, let me walk you through the steps of creating user-oriented videos:
1. Define your audience with keyword research
Defining your target audience on YouTube is the same as understanding them in blogging.
When it comes to understanding them, keyword research is always a great place to start.
As a new YouTube channel, you probably don’t have enough audience data to tell you what worked and what didn’t. You must first “poke around” by conducting keyword research and identifying content ideas that users are looking for.
This will let you understand their needs and pain points.
There is a handful of keyword research tools out there that can help you with this. But to make things 100 times easier for you, let’s use a free plugin called vidIQ.
Since it’s a plugin, you don’t need to open another browser tab to use vidIQ. After installing the plugin for Google Chrome, simply activate it and head on straight to YouTube.
The plugin should load as a sidebar that contains useful insights on the keywords you type.
Suppose your blog is about WordPress website development. If you search for “WordPress development” on YouTube, vidIQ will display additional metrics like the:
- Average views for all videos that rank for that keyword
- Top channels that rank for that keyword
- Highest views for the top video
- Keyword’s competitiveness score
- Related YouTube queries that you can also target
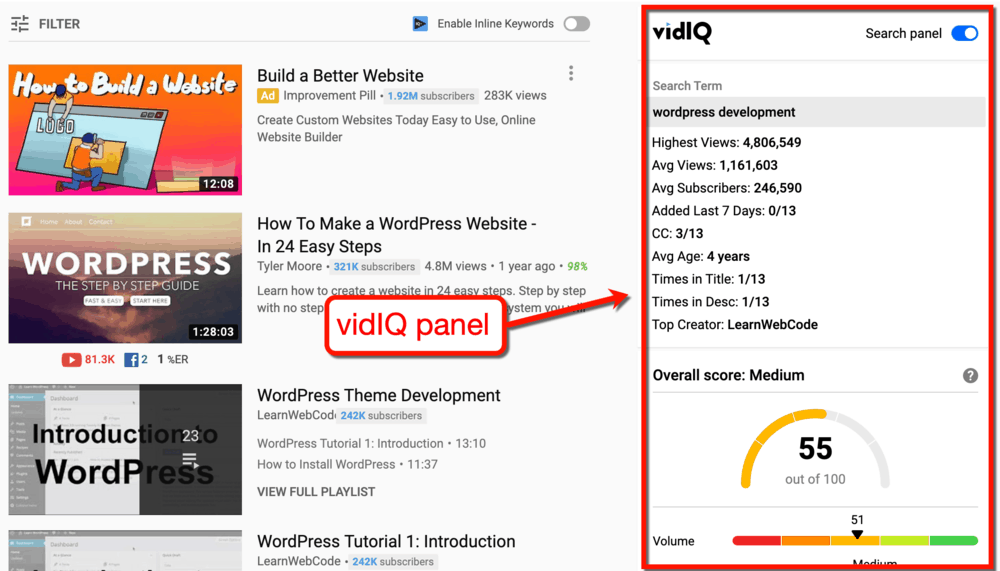
Looking at the screenshot above, we can say that there is indeed a demand for videos that target the keyword “WordPress development.”
To know what else users are searching for on YouTube, look at the “Top related keywords” section. The free version of vidIQ can provide you with three additional keywords that will help you plan your future videos.
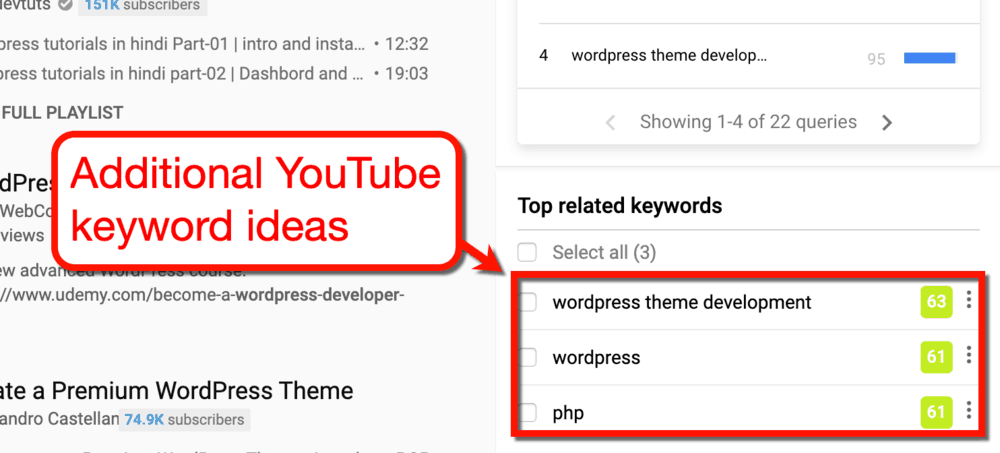
Naturally, you may upgrade to the “Pro” version of vidIQ to get more related keywords. In the meantime, a simple workaround is to do a brand-new search using one of the related keywords shown.
This will prompt vidIQ to retrieve a fresh set of related keywords.
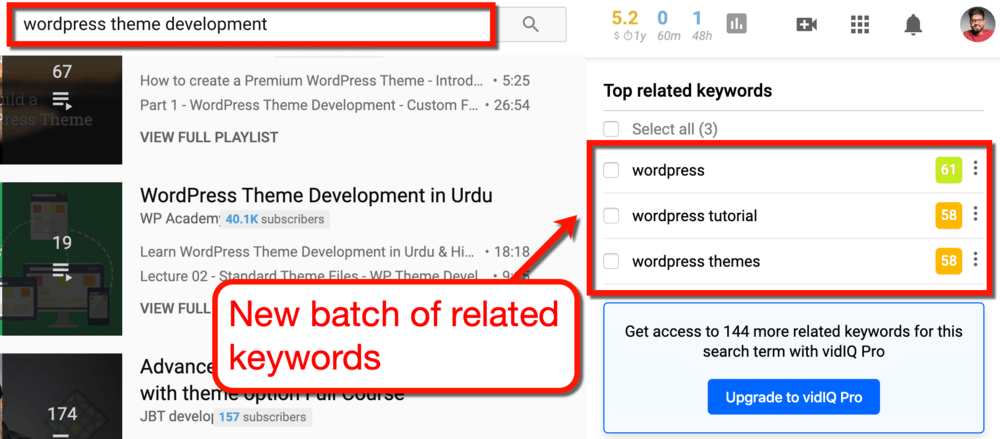
Repeat this step as many times as you want until you find a suitable target keyword for your video.
If you still want more keyword ideas, you can always count on YouTube Autocomplete to give you more. Simply type in the keyword idea you have in mind and wait for a few seconds.
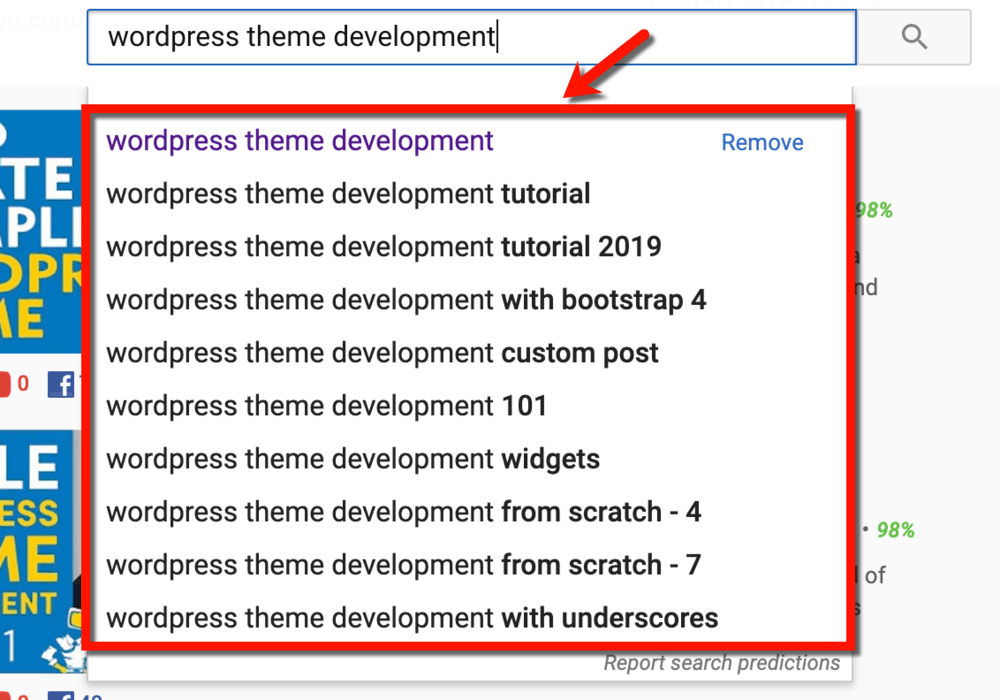
Looking for more tips when doing keyword research for a YouTube video?
Here are a few reminders when picking target keywords for your YouTube efforts:
- Whenever possible, go for keywords with more traffic and less competition.
- Try looking for long-tail keywords to target a narrower audience.
- Avoid controversial videos that may cause YouTube to demonetize your video.
When you understand how YouTube keyword research is done, you’ll find it easy to look for multiple video keyword ideas.
List them all down and sort them according to their traffic potential and competitiveness level. With your keyword list in hand, you’re ready for the next step.
2. Match your keywords with your existing blog content
Keywords may give you an idea of what your YouTube video can be about.
However, you still need to fill in the blanks and write a script to ensure your video’s flow.
If you already have a blog prior to starting your YouTube channel, then I have some good news for you.
Chances are, you already have a post that can answer all the questions that may arise from your YouTube keyword.
In which case, you can take the most important information from your post and fuse it into your video script.
This is the case for many bloggers who create YouTube channels as a promotion platform. Brian Dean of Backlinko, for example, repurposes some of the ideas from his posts to create YouTube videos.
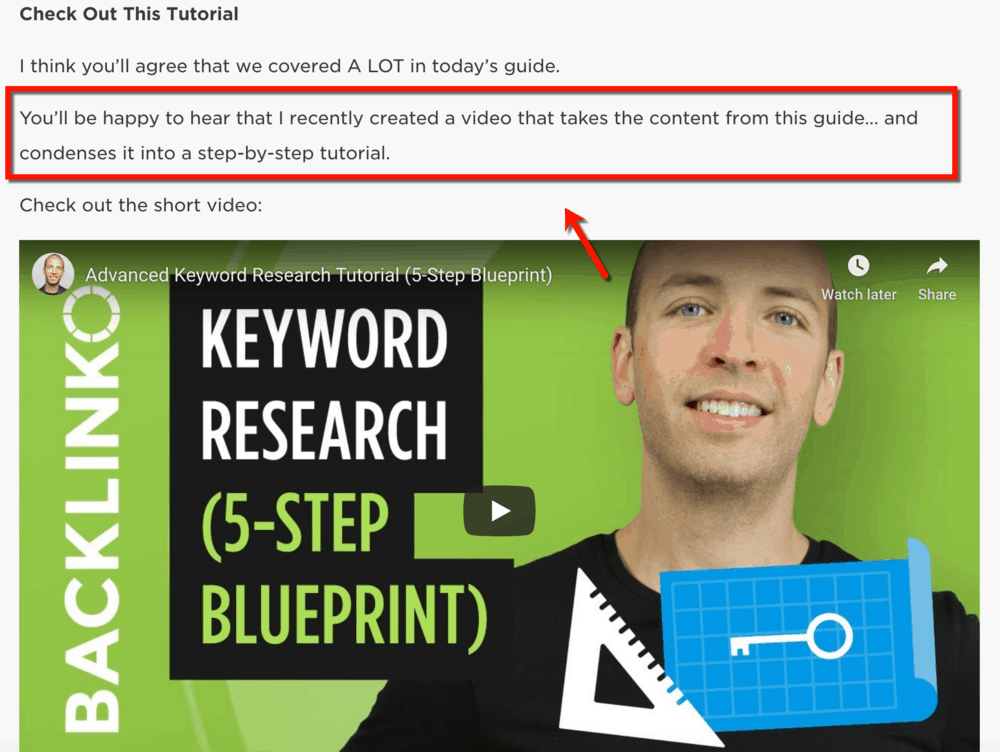
Creating videos that can be paired with your existing post has a few benefits.
For one, sharing your YouTube video with your readers is a great way to win some views.
Additionally, discussing information in video form will definitely lift the user experience and your post’s overall value. All these, in turn, can boost the post’s rankings and get you more organic traffic.
If you can find an existing post that you can use as reference material for your video, that’s great. You can skip ahead to step number four to know what to do next.
But if you can’t, that doesn’t mean you can’t write a brilliant script.
This takes us to the next step of creating user-focused videos.
3. Borrowing ideas from competitors
As long as you want to produce content on the web, you can leverage competitor research to gain an advantage.
In this particular case, you’ll borrow ideas and inspiration from competitors to define talking points for your video.
This can be done in two ways.
First, you can head to Google and look for detailed, full-length articles about your particular keyword.
Second, you can check out the videos of your top competitors within YouTube.
With vidIQ installed, begin by performing a search with your focus keyword. For the sake of this guide, let’s use the term “WordPress theme development.”
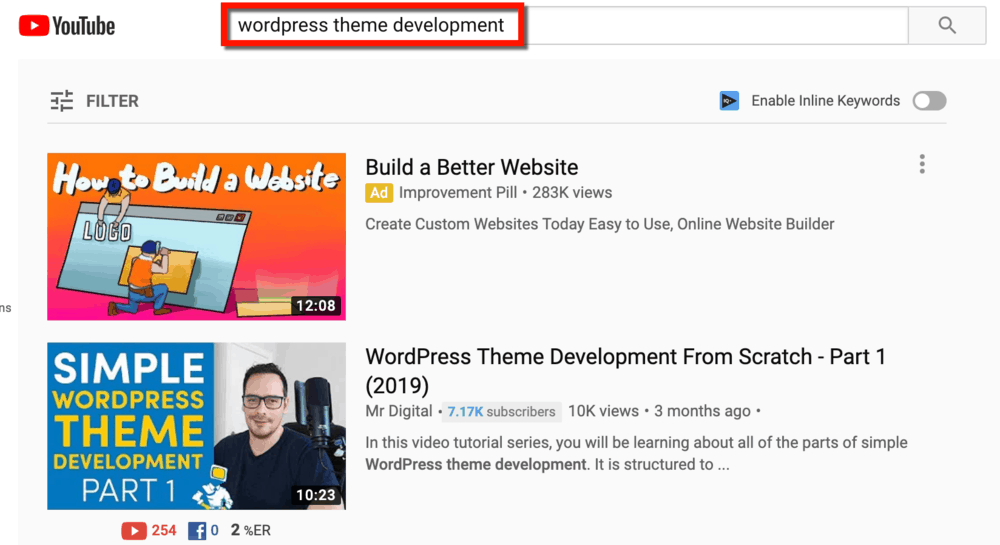
Why did I use this keyword as an example?
A quick look at the vidIQ panel shows that this keyword has reasonable search traffic and low competition.

Those figures are, indeed, encouraging. But they’re not why we did the search this time.
Just below the keyword’s overall score, you’ll find a section called “Top channels for this search term.”
That’s where you can fish for competitors to spy on.
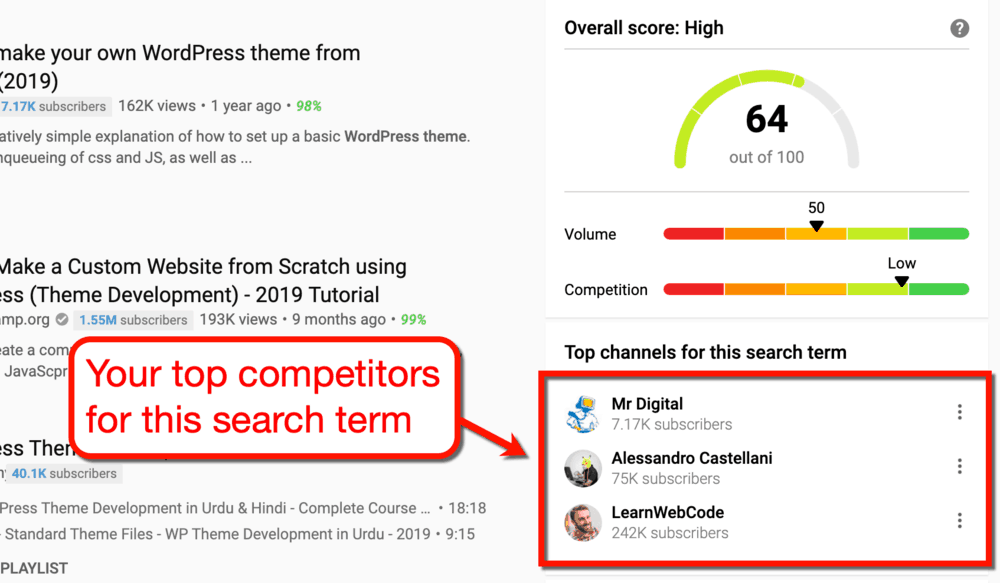
When doing competitor research, I always make it a point to target the biggest competitor I can find.
If you’re going to borrow strategies from a competitor, you might as well target the best one.
According to the vidIQ panel, the channel LearnWebCode looks really promising.
Upon visiting the channel’s page, click on the search bar and type in your target keyword.
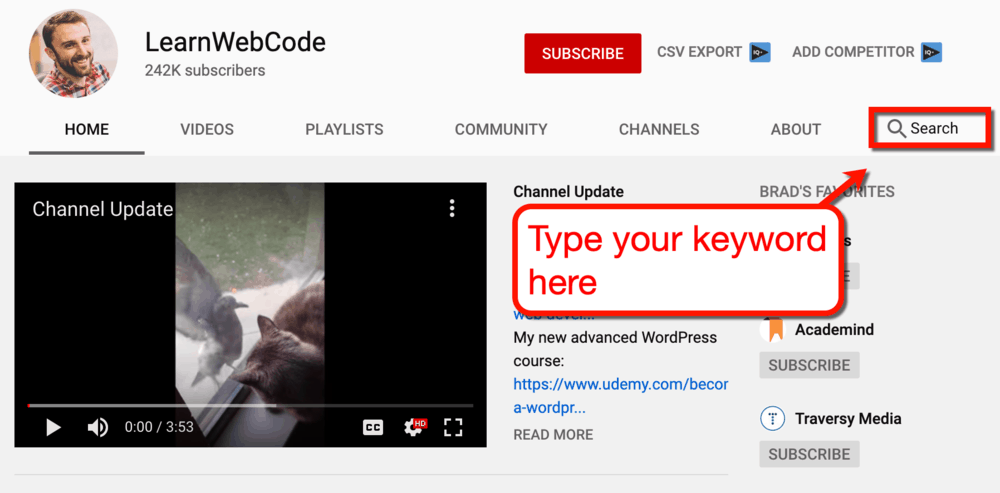
This will take you to the video or videos responsible for the channel’s visibility for your keyword.
In LearnWebCode’s case, it’s actually an entire playlist of videos.
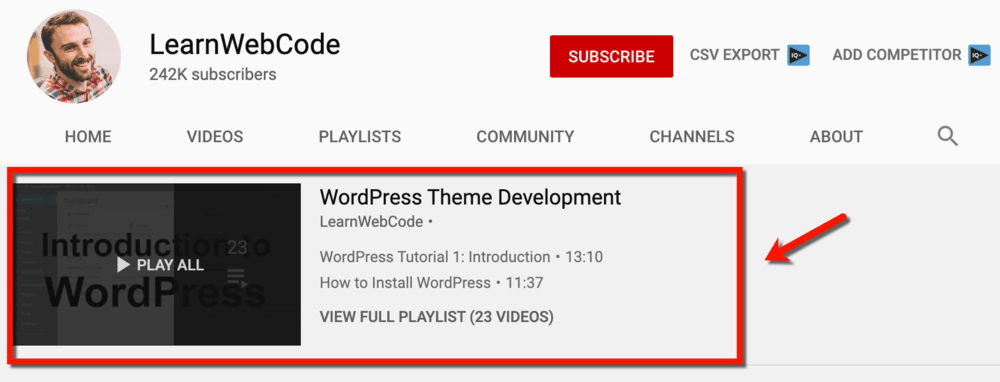
The bad news is, you may need to record enough videos to fill a playlist in order to outperform LearnWebCode. On the flip side, you have a lot of videos to take ideas from.
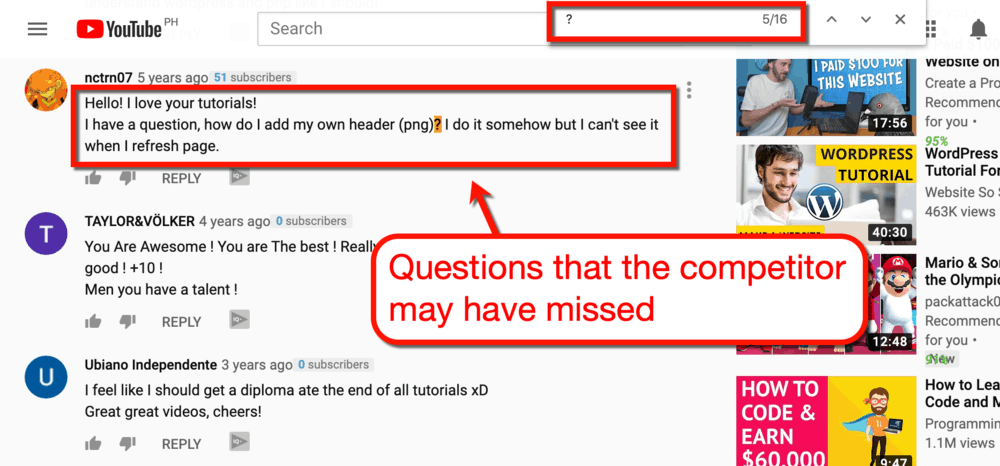
Your next task is to scan your competitor’s videos and look for talking points you can use in your video. It’s also worth looking at the comments section for questions that a particular video failed to address.
A simple trick I use is to use the “search” function in my browser to look for text with a question mark. This can lead you straight to questions posted by viewers.
Looking at the playlist’s contents, you should have enough ideas to give your YouTube channel fresh content for weeks. Just keep writing down ideas and piece together the ones that would make the most sense in a single video.
That’s it — you should now be able to come up with more than enough talking points for your YouTube videos.
What you need to do now is to organize these ideas to form a cohesive video script.
4. List down your talking points
For a seasoned YouTube creator, writing a script is as simple as listing down the main “talking points.” And during the recording process, they simply rely on their own conversational skills and knowledge on the subject.
Okay — many of you may not be experienced enough to use the same approach.
Regardless, identifying the main talking points of your video is an important step in writing scripts.
If you have an existing post that aligns with your target keyword, take a quick look at its subheadings.
You can probably use those as the talking points for your video.
Let’s say I want to target the keyword “Grammarly premium review 2019” for my next video. This keyword aligns with my ultimate Grammarly review post.
Here are some of the possible talking points I can cover in my video:

I can build on this further by incorporating new sections that can make the video more interesting.
For example, I can tell a short story of how I discovered the tool. I could also do a simple test that compares content before and after Grammarly.
It’s all about letting your imagination run wild and handpicking ideas that could work.
If you work with a team, write down all the ideas you have on a whiteboard. You can then discuss which ideas can be incorporated into the video without veering away too much from your takeaways.
How many ideas should you go with before recording your video?
It depends on whether or not you want to monetize your videos through ads.
Let me explain.
5. Deciding if you want to monetize your videos with ads
After brainstorming talking points for your video, you now have all the pieces you need to create something remarkable. But first, you need to make another decision.
Do you want to show ads in your video once it goes live?
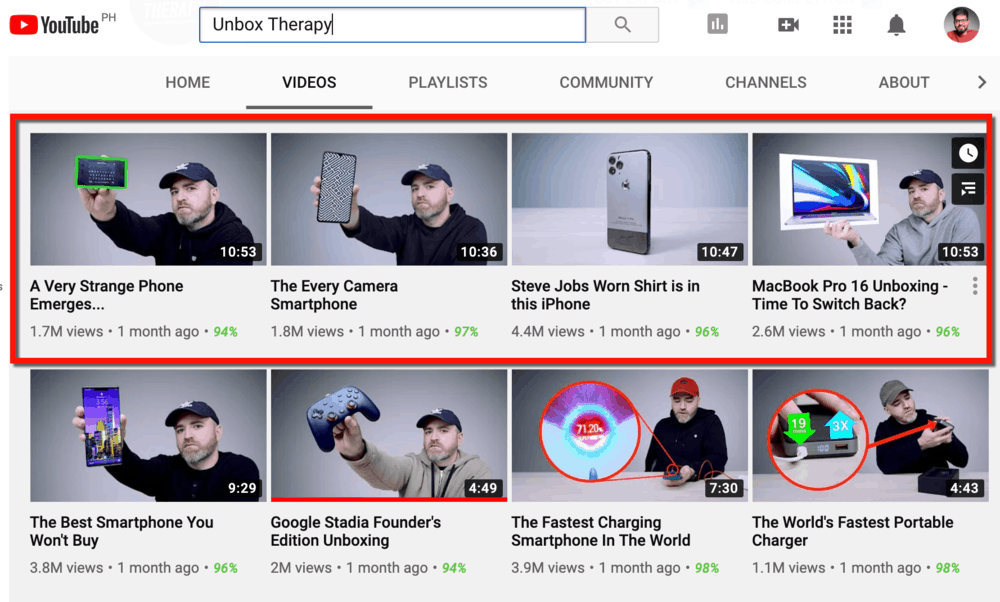
If you do, then try to create an outline that can produce at least 10 minutes of video time.
It’s not exactly rocket science: the longer the video, the more ads you can cram into it.
In fact, established YouTubers have seen up to three times more ad revenue with 10-minute videos than shorter ones.
You can observe the same strategy being practiced by a lot of big-name YouTubers today.
Since you’re already thinking about YouTube ads, you should check out the eligibility requirements for their Partner Program.
Here’s the list of the minimum eligibility requirements:
- A complete understanding of YouTube’s monetization policies listed here
- Have over 4,000 total watch hours within the past 12 months
- Have over 1,000 subscribers
- An active Google AdSense account
As an additional requirement, you must live in a country or region that’s supported by the YouTube Partner Program. To check your location’s eligibility, check out this post.
6. Building your video script
The number one rule for writing YouTube video scripts is to rely on your natural speaking voice and tone.
In this blog, I’ve mentioned the value of writing with a conversational tone in a few posts like this one. Not only will it help you forge a more personal connection with readers, it’ll also help define your writing style.
The same principle applies when writing video scripts.
You can’t write lines that look like they’ve been taken out of a textbook. Instead, every sentence must be crafted as if you’re straight-up speaking to a friend.
This takes a lot of practice, especially if you’re not a native English speaker. The only advice I can offer is to form a habit of reading your drafts aloud.
That should make it easier to detect if something sounds “off” in your writing.
You can simplify this process using a text-to-speech tool like NaturalReader.
To use it, paste your draft into the tool’s editor and click the ‘Play/Pause’ button in the top toolbar.

Can you imagine yourself speaking your draft aloud in front of a camera?
Good — that means you’re cooking up a crispy, golden-friend YouTube script.
Keep at it and remember that everything doesn’t have to be perfect. There’s a good chance that you won’t follow your script to the letter, anyway.
Being able to improvise while recording is a sign that you’ll make a great YouTuber. Build on this skill and it’ll prove useful once you fully integrate videos in your blog’s content strategy.
Just be sure that your script has the following components to deliver a meaningful experience to your would-be viewers:
- Hook — When writing YouTube video scripts, the first 15 seconds is of utmost importance. You need an attention-grabbing headline, a beautiful visual, and a mention of the problem the video will solve.
- Intro — Just like in blog writing, your intro’s job is to captivate your audience — encouraging them to consume the entire content. Just like the hook, keep the intro short and immediately mention how the video can help solve their problems.
- Video Body — Pacing is a crucial factor to consider when writing the body of a YouTube video script. As much as possible, maintain the same length for all talking points and avoid dragging out certain parts too long.
- Call to Action — Just a conclusion that recaps the video’s body won’t be enough. To maximize the impact of your video, tell viewers exactly what they need to do next.
7. Ensuring the engagement factor of your video with the VET formula
Still not sure about the direction of your script?
Video content expert Salma Jafri devised a video formula that can help ease your worries.
With the VET formula, you can plan how every part of your video fits in a 10-minute timeframe.
Short for Video Engagement Timeline, the VET formula is essentially a reusable format for YouTube videos.
Here’s a quick breakdown of the VET formula:
- 0:00 to 0:50 — Intro
- 0:50 to 1:00 — Video Title
- 1:00 to 3:00 — Discussing and Framing the Problem
- 3:00 to 8:00 — Discussing Solutions with Examples
- 8:00 to 10:00 — CTA
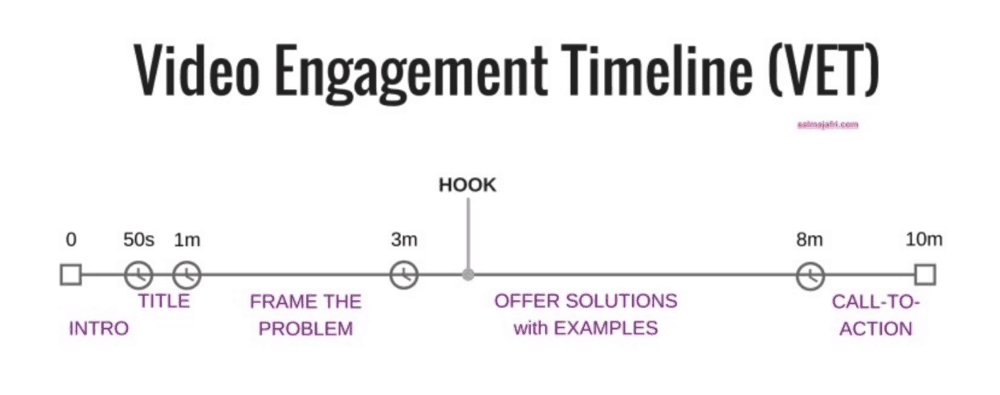
As you can see, the VET formula is designed for the creation of 10-minute videos. That means it’s perfect if you plan to monetize your blog with ads.
Additionally, you may notice that the hook is placed somewhere in the middle of the VET formula.
Showing the hook right at the beginning is, of course, ideal for encouraging viewers to watch the whole video.
The VET formula also lets you do this by immediately bringing up the problem your video will solve. It merely reminds you to insert another hook in the middle of your video — just before you discuss the solutions.
Why is this important?
Two words: viewer retention.
Now that you understand the VET formula, you can finalize the structure of your script by inserting your talking points.
To give you an example, here’s what my video script for “Grammarly Premium Review” will look like:
- 0:00 to 0:50 — What is Grammarly Premium and do you need it for blogging?
- 0:50 to 1:00 — Grammarly Premium Review: Reviewing its Pros and Cons
- 1:00 to 3:00 — The problems of blog content writing (time constraints, prone to errors, plagiarism, etc.)
- Hook — Grammarly helped me turn a 2-hour proofreading task into a 10-minute walk in the park
- 3:00 to 8:00 — Using Grammarly: different ways to use it, exploring the user interface, setting custom goals, Grammarly alerts, plagiarism checking, and hiring a human proofreader
- 8:00 to 10:00 — The different plans of Grammarly Premium (plus a discount offer through an affiliate link)
See how it works?
Feel free to polish your script as you see fit. It’s always a good idea to try and find improvements in your content until you’re completely confident in the outcome.
You should also compare your script with your competitors’ videos. That should help you determine if your video script’s quality is up to par.
Once you’re done writing the script, all that’s left to do is rehearse and record the video.
8. Rehearsing and recording your video
Experienced YouTubers may no longer need a rehearsal process to effectively deliver their message in video form. But for beginners, it is a crucial step in video content generation.
Your goals here are to:
- Make sure you say the words right
- Get rid of unnecessary and awkward mannerisms
- Minimize verbal fillers like “um,” “ah,” “kind of,” and “sort of”
- Build up your confidence when speaking in front of a camera
More often than not, rehearsing your video script will also let you identify possible improvements that you may have missed. Don’t pressure yourself to memorize the whole script and just focus on getting the words out.
Remember that memorizing every single word in your script isn’t a goal.
I, myself, don’t let stress get the better of me when rehearsing my YouTube video scripts. At times, I just use my smartphone’s camera to check how I look when delivering the script.
During the recording process, you can always go off-script or review the script on the fly. You can cut the parts where you read the script and take the ones where you speak the words perfectly.
Once the recording session is done, you probably have a dozen clips that you’d like to combine into one video. You may also want to add visual effects, sounds, animations, or a custom intro for your YouTube videos going forward.
This is the part where we talk about the next most important thing in video content creation: video editing.
How to Edit Your YouTube Videos
You’ve already built your channel, set up your studio, and captured clips for your YouTube videos.
You have every right to be proud — but your work isn’t done just yet.
After recording video content from your scripts, it’s time to put them all together into one final piece of content.
This is where video editing comes in.
Unfortunately, I won’t be able to give you a step-by-step guide on how to edit your videos.
It is an intricate process that warrants its own full-length post. Plus, the individual steps also largely depend on the software you’ll use.
At this point in time, all I can give you are tool suggestions and general tips when editing videos.
Let’s start by finding the right video editing software for you.
Free video editing software
Free video editing tools are generally recommended to new YouTube creators for good reasons. In addition to lowering their overhead costs, these tools are also designed to assist beginners in the learning process.
1. iMovie (Free for MacOS)

If you’re a MacOS user, you can use the built-in iMovie app to edit your videos for free. It lets you perform all the basics — from combining and trimming clips to adding transition effects.
2. Video Editor (Free for Windows 10)
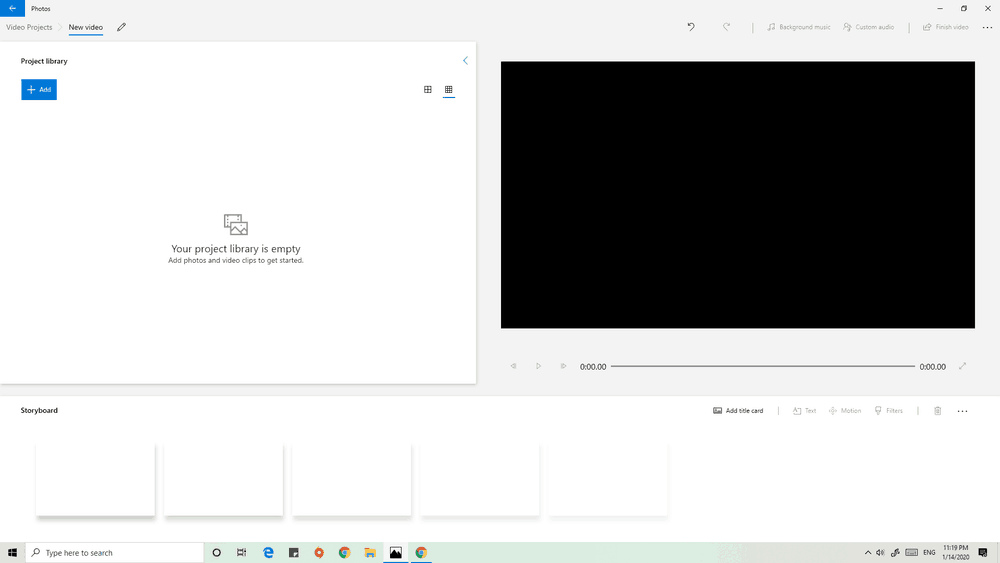
For Windows 10 users, Video Editor is a free app that has the same basic features as iMovie. You can also add 3D effects, text overlays, filters, and title cards to your video.
3. Shotcut (for Windows)
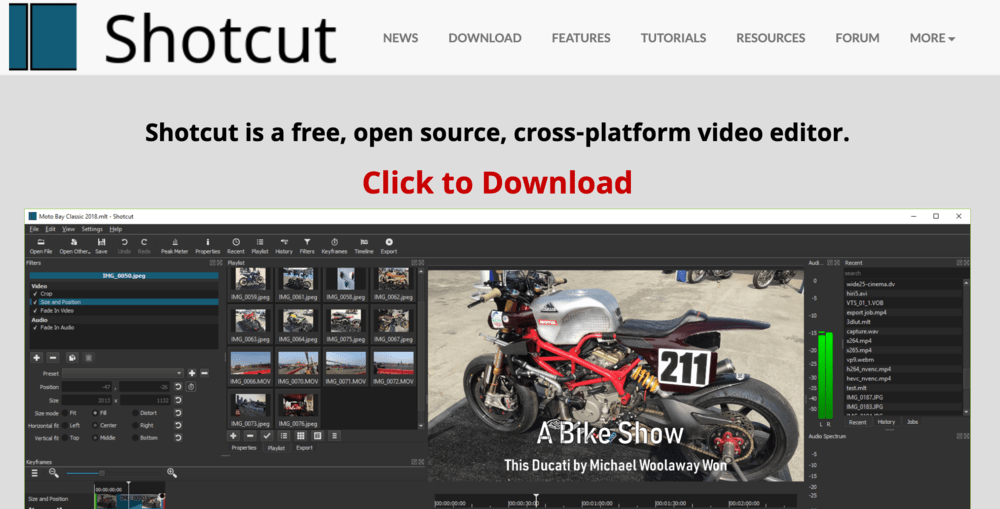
Shotcut is a popular, open-source video editing tool designed for beginners. It offers a more complete set of editing features than most free solutions — plus, free learning resources on their site.
4. OpenShot (for Windows and MacOS)
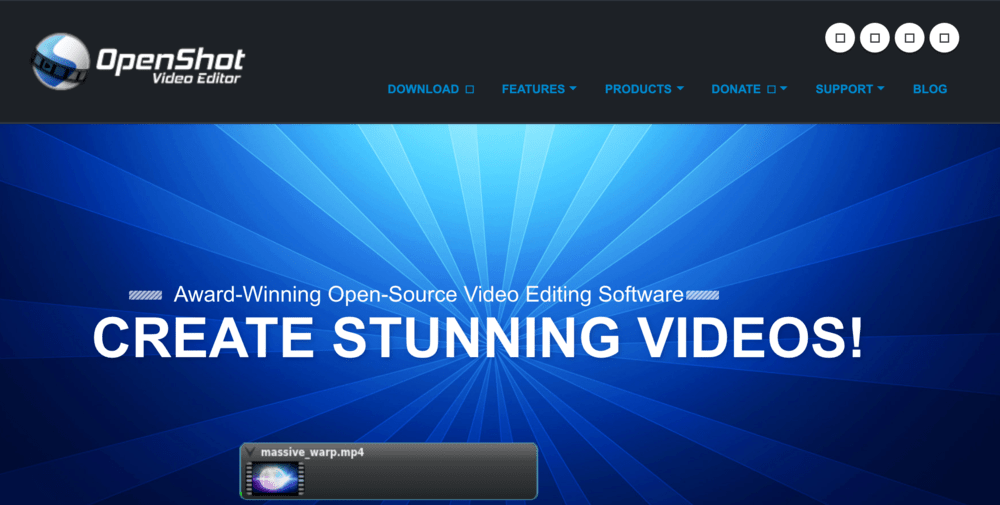
OpenShot is another open-source video editing tool that’s comparable to Shotcut in terms of features. The main difference is, it’s also supported by MacOS and Linux-based devices.
Paid video editing software
As you gain experience in the field of video editing, you begin to consider upgrading to a premium tool.
Here are some of the best video editing tools money can buy:
Final Cut Pro (for MacOS)
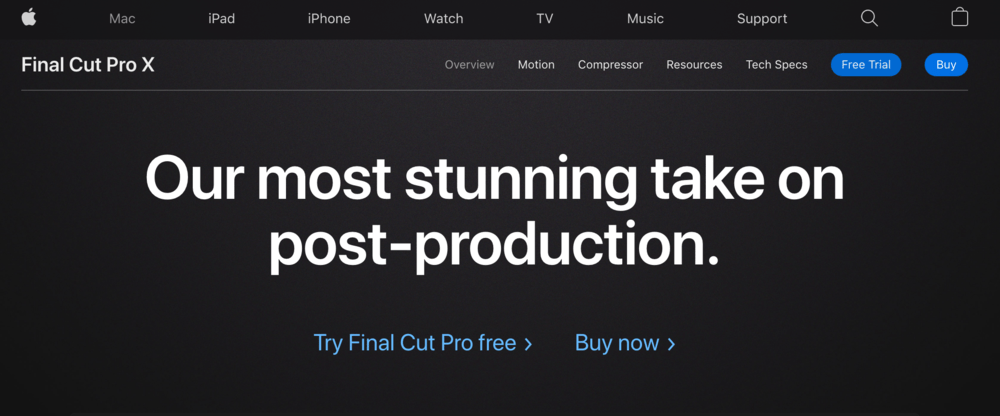
Final Cut Pro is widely considered as the best consumer video editing software due to its lineup of professional-grade editing features. The big downside is, you’ll need to pay an upfront cost of $299 to start using the software.
Adobe Premiere Pro (for Windows and MacOS)

Whether you’re a Windows or MacOS user, Adobe Premiere Pro should be in your list of potential video editing software. As part of Adobe Creative Cloud, you can take advantage of new features as they’re released, like automatic reframing and audio enhancements.
PowerDirector (for Windows)
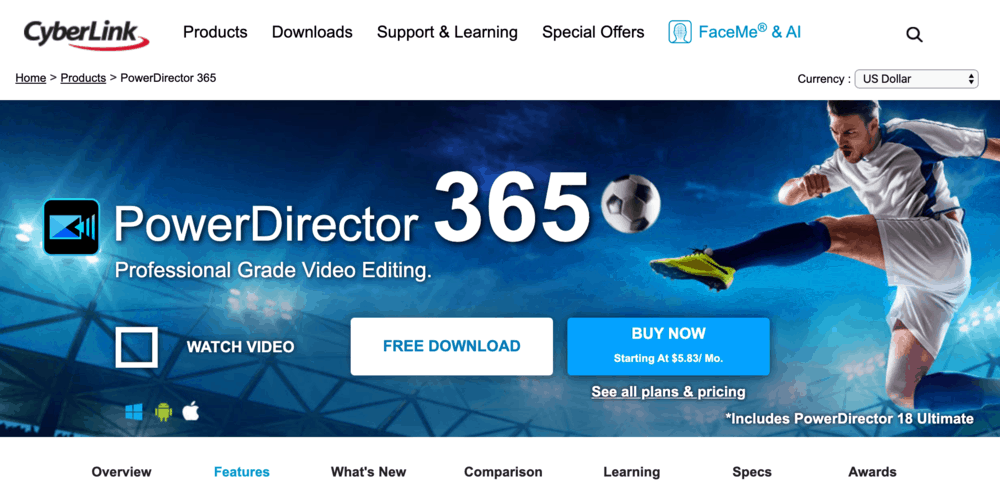
For Windows-powered YouTube creators, PowerDirector is another great alternative to Final Cut Pro. Its robust set of features include transition effects, ready-made templates, animated titles, and motion tracking.
Picked a tool you’d like to work with?
Editing your first video can be quite daunting, but you’ll feel more comfortable as you make progress.
Rest assured that, while the interface in every tool is unique, the fundamental components and workflow should be similar.
With that out of the way, the typical video editing workflow goes like this:
- Importing media assets to your project — Before you can start working on your video, you need to import the clips, images, and sounds that you need. Most video editing software has a bulk-import button, while others let you drag and drop media directly into the interface.
- Building your timeline — Once all your assets are in place, add them in chronological order to your timeline to create your “rough cut.” Feel free to add multiple takes of the same scene and just decide what to keep later.
- The fine cut — After you build your video’s complete timeline, cut out unnecessary parts at the beginning and end of each individual clip. This will smoothen the transition between clips and eliminate footage of you reading the script, making mistakes, and so on.
- The picture lock — During the “picture lock” stage, you’ll spend most of your time organizing clips into their own designated tracks. For example, if you captured outdoor footage for your video, group all outdoor clips into one track for post-production purposes.
- Polishing your video for upload — Finally, it’s time to add the finishing touches to your video. This is where you can apply transition animations, incorporate background music, add visual titles, and perform color corrections.
Of course, reading about the steps above is a less instructive experience than seeing them for yourselves. And for that, I recommend you check out this video guide by Matti Haapoja.
Video editing tips
Nervous about your first time editing a video? The following tips should help build your confidence:
- Use waveform to easily find parts where you’re talking — During the fine cut process, you can quickly find unnecessary parts by looking at each clip’s waveform. This is a visual representation of sound changes in clips — displayed in a video editor’s timeline.
- Set your video’s quality — Don’t forget to modify your project’s settings and choose the resolution you want for your video. 1080p is preferred on YouTube, but if you have slow internet, choose 720p for faster upload times.
- Look for stray clips during the picture lock stage — No matter how careful you are, you may still have missed a stray clip or two in your timeline. Grouping your clips into tracks during the picture lock phase will help you find them.
- Invest in a mid-end or high-end computer — Whether you like it or not, editing videos on a low-spec computer can be a nightmare. If you can, invest in a higher-end PC to speed up rendering times and avoid frustrating crashes.
- Ensure your computer has enough free space — Creating your own video content can take up a lot of space in your drives. A rule of thumb is to have a 1TB drive ready and delete old footage you no longer need.
- Go easy on the effects — If you don’t know what to do with effects and various tools in your video editing tool, leave them alone. As long as you have high-quality clips, clear audio, and a meaningful message, viewers will be happy with your content.
- Insert your target keyword in your video’s filename — Remember when you identified your target keyword for your video? Find a way to insert it in the video’s filename before you upload it to YouTube — you’ll understand why later.
Ultimately, it’ll take some time and effort before you get used to the whole video editing experience. You will probably spend several hours editing your first video, but you should get faster over time.
What comes next are a couple more hours rendering your video and uploading it to your YouTube channel.
For a 10-minute video, an upload could take anywhere from 30 minutes to a few hours. While waiting for the upload to finish, you can set your video’s title, description, thumbnail, tags, and various other details.

If you’re familiar with SEO, you should know that you can’t just write whatever you want in these fields.
This brings us to the next part of your YouTube marketing strategy: optimizing your videos for YouTube search.
Optimizing your YouTube Videos
In blogging, you don’t just publish your post and wait for traffic to come.
You pick yourself up, get on your computer, and execute persistent content promotion strategies to draw readers in.
Additionally, you need to ensure the optimization of SEO factors like keyword placement, meta data, and internal links.
The same should be done after you upload videos to your YouTube channel.
As soon as you start uploading your video, you need to think of the optimizations needed to boost its searchability.
Without further ado, here are the video optimization tips you need to do:
1. Inserting your target keyword where it counts
In the previous section, I mentioned that you should add your target keyword to the video’s filename.
Just like any other search engine, YouTube doesn’t “watch” your video to understand what it’s about. Instead, it relies on certain, on-video factors to determine its relevance.
Yes — the keywords sprinkled all over the video’s details are included in these factors.
You already have your target keywords before you even write your video’s script. This time, you just need to put it into the right places, namely:
- The video’s filename
- Title
- Description
- Tags
However, simply containing your target keyword doesn’t make a video’s title and description SEO-friendly. You need to write something that will also satisfy your target audience — not just YouTube’s search engine algorithm.
2. Write a descriptive and captivating video title
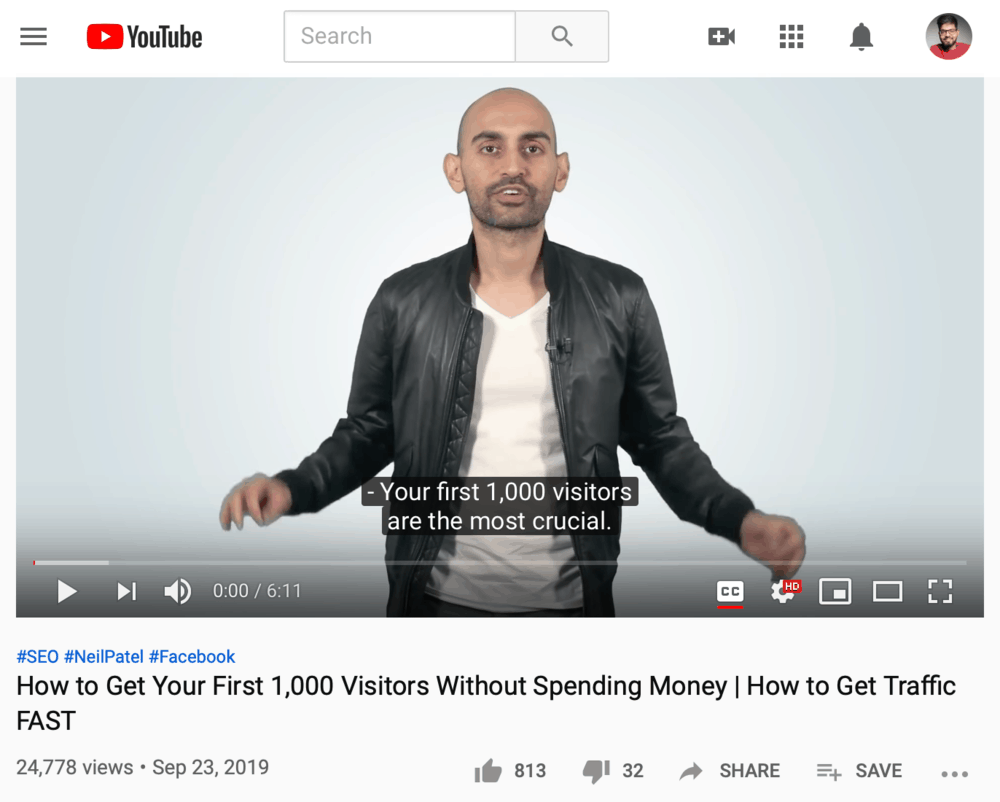
As the first thing users see in YouTube’s search engine results, your video title must be both descriptive and eye-catching.
I know — creating titles for content is never easy. But if you abide by certain rules, then it’s only a matter of mixing and matching words.
Here are the rules you need to remember when creating YouTube video titles:
- Keep it within 60-70 characters long — Although YouTube allows titles up to 100 characters long, you should keep yours within 60 to 70 characters only. Any longer than that and your title might get truncated or cut when shown in search results.
- Include numbers — Adding specific numbers to your YouTube video titles will let viewers know exactly what to expect. Knowing that there’s more than one piece of information in the video will also encourage more users to click.
- Use the word “without” — Using “without” in your title can highlight both the problem your viewers have and the solution you’re proposing. A good example would be Neil Patel’s video called “How to Get Your First 1,000 Visitors Without Spending Money.”
- Tease your audience — Teasing your audience with a question or cliffhanger goes against describing what the video’s explicitly about, but it sometimes works. Unbox Therapy, for example, uses clever titles like “This Gaming Laptop has a Secret Trick” and “This Smartphone Changes Everything.”
- Don’t force your keyword — Don’t worry if the title doesn’t include the exact match of your target keyword. What’s important is that each individual word is included in the title.
3. Immerse your audience with your video description
Writing descriptions for your YouTube videos should be a straightforward process.
What you need to do is provide some context for viewers.
After all, a lot of users don’t just stare at the actual video every second it plays. Some users immediately scroll down to the comments, check out related videos, or read the description for more information.
Although YouTube allows up to 5,000 characters in a video’s description, there’s no reason for you to target that length. Just focus on maximizing the utility of that space with the following elements:
- An Impactful Blurb — Right off the bat, your description should provide an overview of your video’s topic. Describe the problem that it’s trying to solve and give a hint on what your proposed solution would be.
- Your Target Keyword — YouTube recommends mentioning your most important keyword right at the beginning of your video description. No need to think about keyword density — just mention one or two target keywords at least once each.
- Timestamps — Timestamps are clickable links that let viewers skip to a specific part of a video. To add a timestamp, simply type in the time in minutes and seconds format along with a description for it.
- Affiliate Links — If you promote affiliate products in your video, don’t forget to insert the corresponding affiliate links in the description. Just be sure that they’re relevant to the video’s topic, labeled clearly, and aren’t disguised with a link shortener.
- Other Links — You can also insert links to other relevant pages like your social media accounts, Patreon account, and website. Just be mindful of YouTube’s policies when it comes to links in your video content.
- Additional Details — It also helps to add a short list of your video’s main talking points. This will help viewers decide if they should watch the whole video or not.
4. Enter SEO tags for your video
I discussed earlier how to use SEO tags for your videos from your YouTube Studio page. However, it’s worth noting that you can add these tags as soon as you upload your video.
On the ‘Details’ tab of the upload window, scroll down to the “Tags” section and type in your desired tags. If you want to enter multiple tags, use a comma to separate each of them.
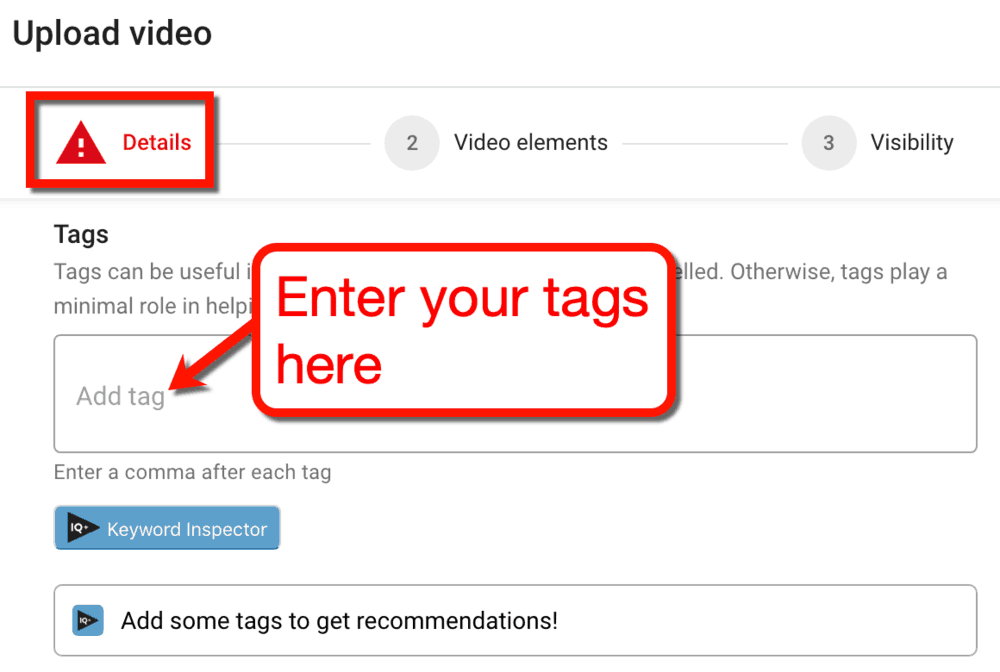
Don’t know which tags to include?
If you installed the vidIQ plugin for Google Chrome, you should get suggestions as soon as you enter a tag. Look for them in the “Recommended Tags” box directly below the “Tags” field.
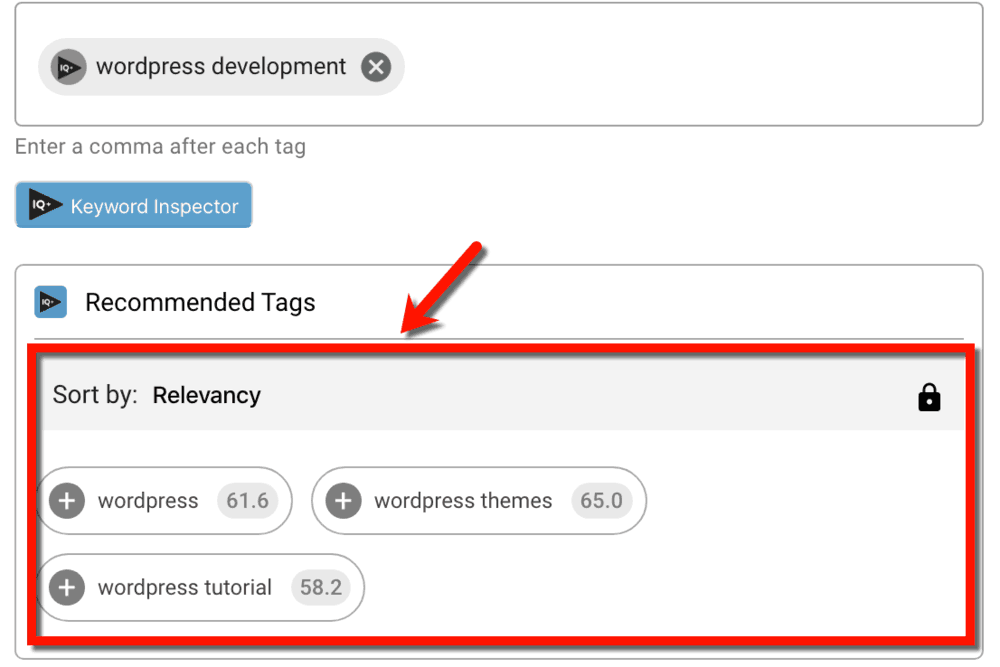
5. Adding custom subtitles and closed captions
In YouTube, non-native English speakers and individuals with hearing impairment are more common than you think. There are also people who tend to watch YouTube videos with no sound, especially while traveling or in a public area.
To make your video content more accessible to these users, upload accurate captions or subtitles by clicking ‘UPLOAD SUBTITLES/CC.’
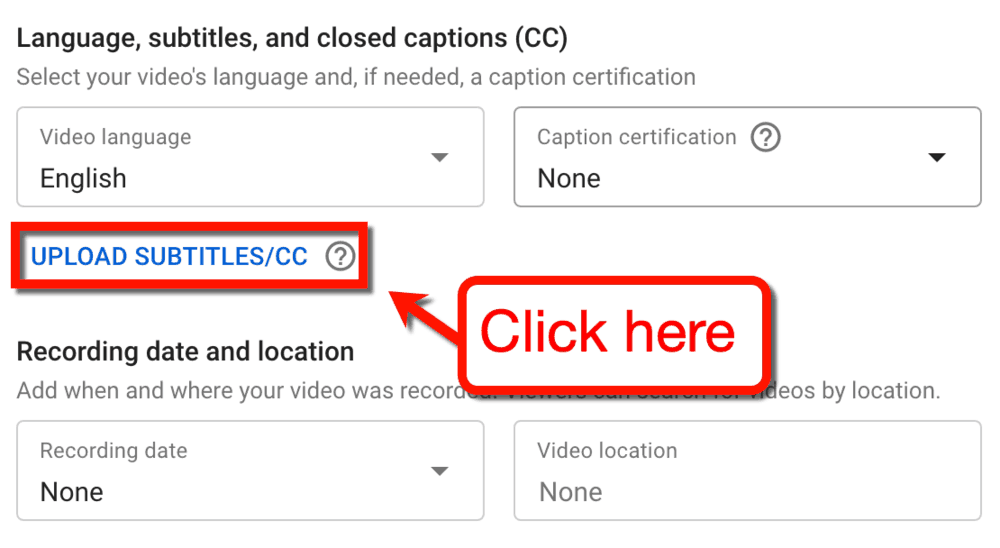
Take note that, while subtitles and closed captions are technically the same, they fulfill different functions.
In video content, closed captions are designed simply to transcribe speech into text. Subtitles, on the other hand, are meant to translate speech into a different language.
Either way, the steps in creating both captions and subtitles are the same.
Most video editing software should let you add subtitles using a built-in tool. Final Cut Pro, for instance, allows you to enter captions straight into a specific point in the video’s timeline.
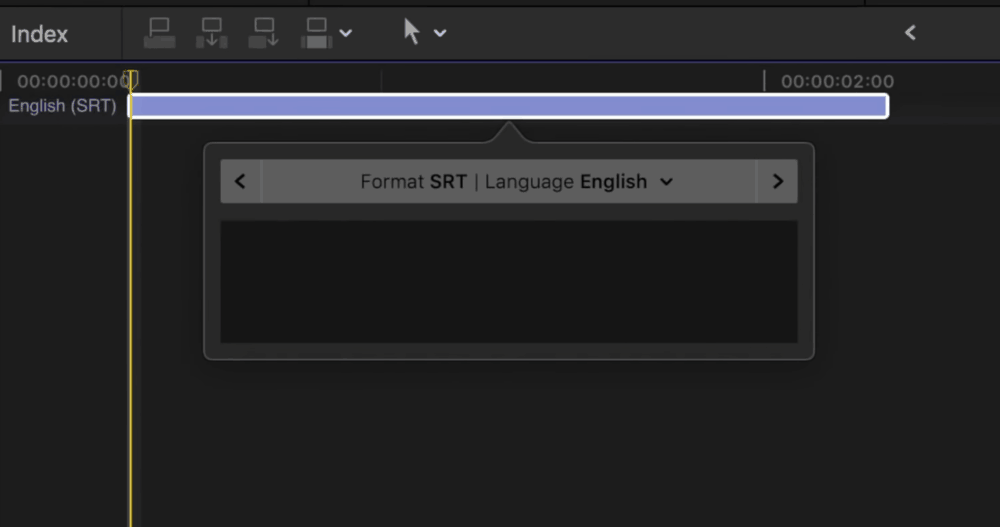
The file can then be exported using different file formats, like iTT, SRT, and CEA-608. For YouTube videos, the recommended file format is SRT.
If, for some reason, you’re not happy with your video editing tool’s captioning feature, use a tool like SubRip instead.
YouTube also has a captioning tool baked into the platform, which you can learn about by watching this video tutorial.
Whether or not you add closed captions to your video, enter the rest of the needed information on the details page. This includes the video’s recording date, location, and category.
As for the license, distribution, and commenting options, it’s best to leave them except for specific reasons. For example, if you’re uploading a test video, you may disable comments and the “publish to subscriptions feed” option.
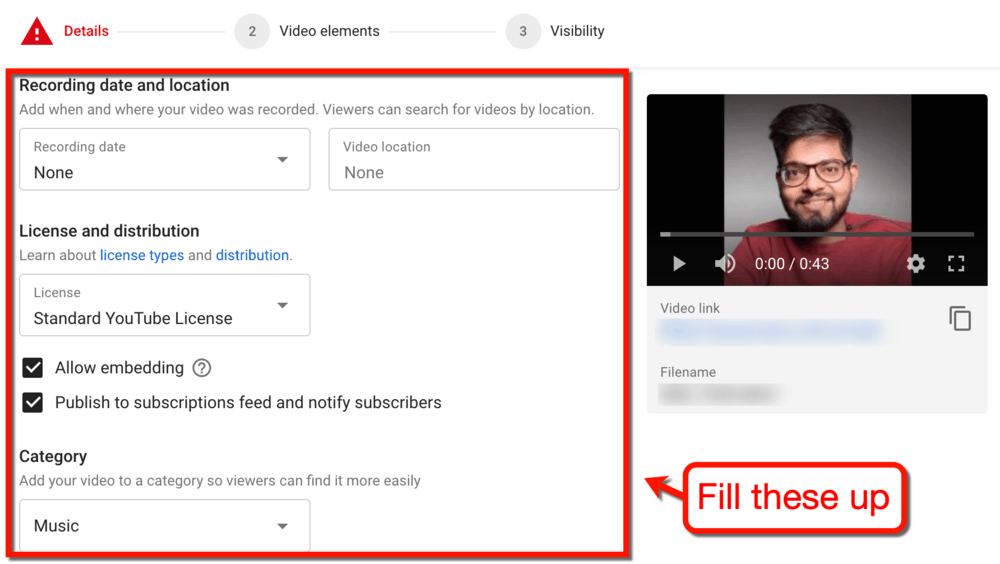
Of course, you may also set custom visibility settings to hide your video — but more on that later.
Here’s another thing to remember:
If you’re uploading a sponsored video, you need to let YouTube know.
You can do so by ticking the checkbox below the “Paid promotion” section.

Don’t worry about this option if you’re merely promoting affiliate products in your video. Unless another brand has paid you to publish the video, then it doesn’t count as a paid promotion.
6. Add additional video elements to enrich your viewers’ experience
Aside from captions and subtitles, YouTube also allows you to incorporate additional video elements into your uploads.
An “End Screen,” in particular, is useful for promoting extra CTAs. These are engaged viewers who reach the end of your video, making them more likely to take action.
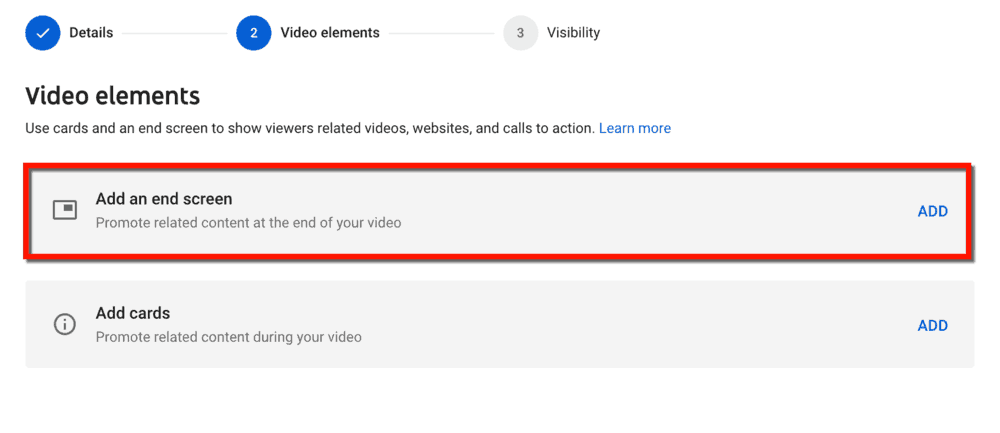
Here’s a list of the elements you can display on your video’s end screen:
- Video or Playlist Recommendations — An end screen lets you recommend additional videos or playlists that your viewers may like. You can promote your latest upload, a specific video or playlist, or anything that YouTube deems relevant to the audience.
- Subscription Button — Ideally, you should ask viewers to like and subscribe to your channel in the video itself. You may also add a subscription button to your video’s end screen as a gentle reminder.
- Link to Another Channel — If there are other channels you wish to promote, you can also link to them on your end screen. This can be your own alternate channel or a partner brand’s.
- Link to an External Site — YouTube’s end screen also lets you put links to your own site. Just take note that you need to be a member of the YouTube Partner Program to do this.
End screens are a great way to leverage the interest invested in your video by your viewers.
Unfortunately, not all of them make will make it all the way to the end.
YouTube understands this, which is why they provide creators the option to show similar elements while the video still plays.
By choosing ‘Add cards’ in the ‘Video elements’ tab, you can add playlists, videos, and links anywhere in the video. You can also create a poll to extract valuable feedback, suggestions, and insights from your viewers.
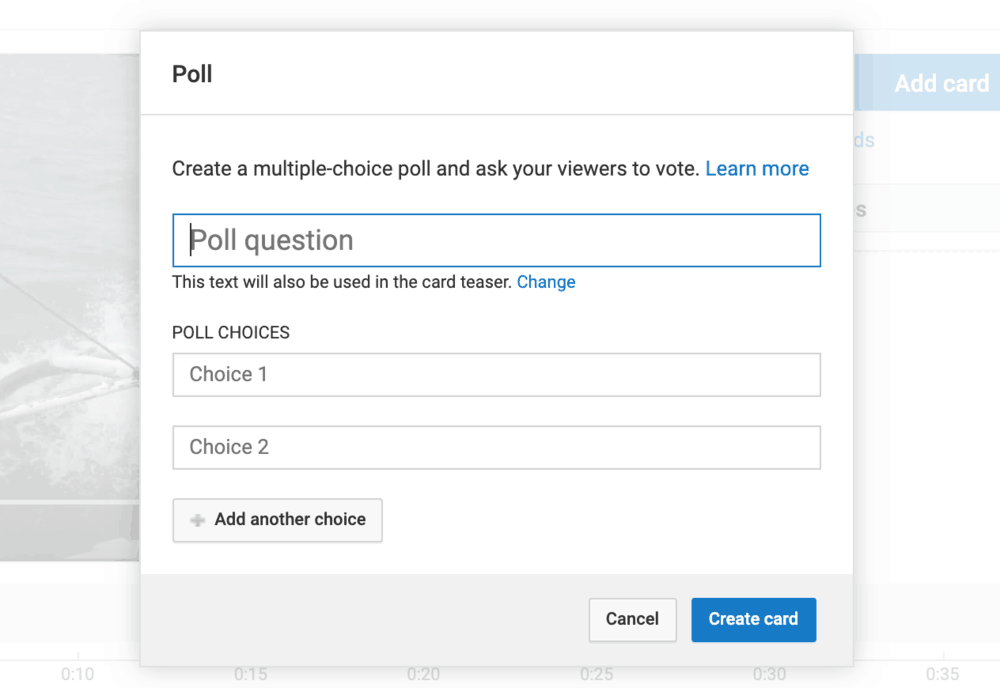
Of course, you shouldn’t go out of your way to add a poll to each and every video you upload.
See to it that you’re utilizing it in a fun and meaningful way. Otherwise, you’re only adding unnecessary friction to your audience’s experience.
Below are a few possible use cases of a poll card in a YouTube video:
- Asking for product recommendations that you can review in your next video
- Ask your viewers if they’re happy with a recent change in your YouTube content strategy
- Let viewers determine which YouTube channel you should collaborate with
- Ask a fun question or trivia that you’ll answer in your next video
7. Managing your video’s visibility
The third step involved in publishing a YouTube video is managing its visibility settings.
If you want to publish your video immediately, you can set the video’s visibility to the following:
- Public — Make your video visible to all YouTube users.
- Unlisted — Hide your video to everyone except for those who have its direct link.
- Private — Keep your video hidden to everyone but yourself.
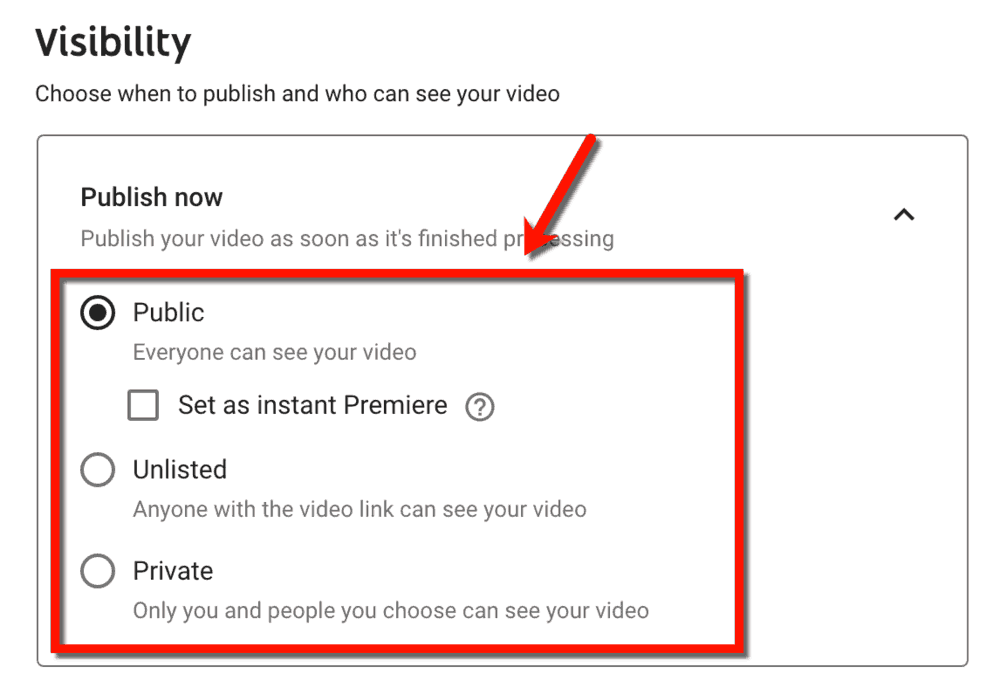
You can also set your video as an “instant Premiere.” This lets you and your audience watch the video together on a special, shareable watch page.
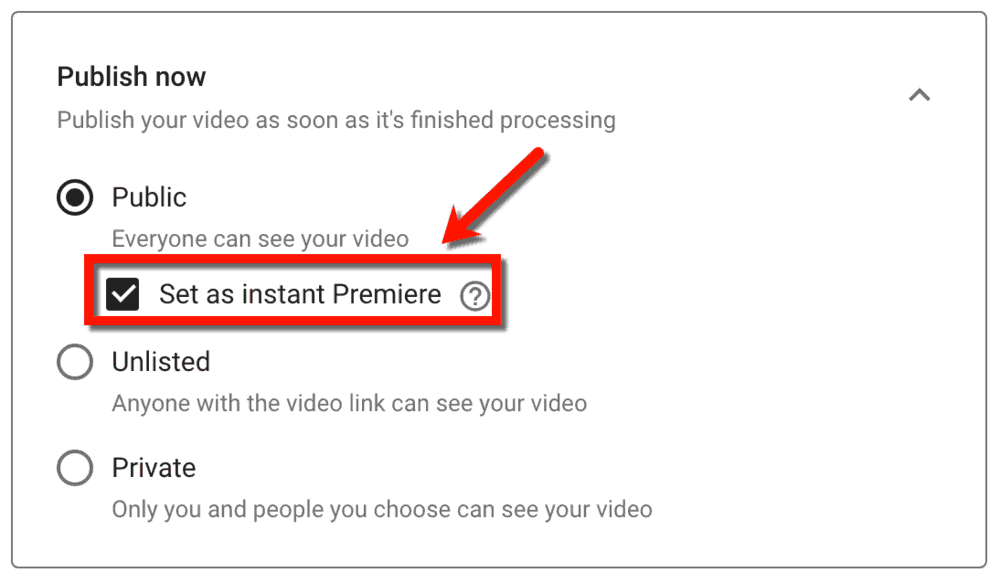
An instant Premiere is different from regular video uploads for a few reasons. Unlike a regular video, an instant Premiere…
- Sends a reminder 30 minutes before the Premiere to subscribers with notifications turned on
- Shows a two-minute countdown before the video goes live
- Shows the real-time viewer count as the video plays
- Doesn’t allow viewers to fast-forward — they can only scrub the video backwards
- Has a live chat feature where viewers can communicate in real time
Publishing your video as an instant Premiere is a good way to generate social media buzz. It gives your audience a sense of exclusivity and being “in the moment,” which never fail to boost engagement.
The cherry on top is, an instant Premiere is automatically converted into a regular video when it’s over. It’s a risk-free strategy with high potential rewards.
8. Create awesome thumbnails
If blog posts need featured images that capture the audience’s gaze, YouTube videos need thumbnails for the same purpose.
A lot of YouTube creators find success in using a still image from the video itself as the thumbnail. They simply throw in additional visual elements that can help viewers understand what the video is all about.
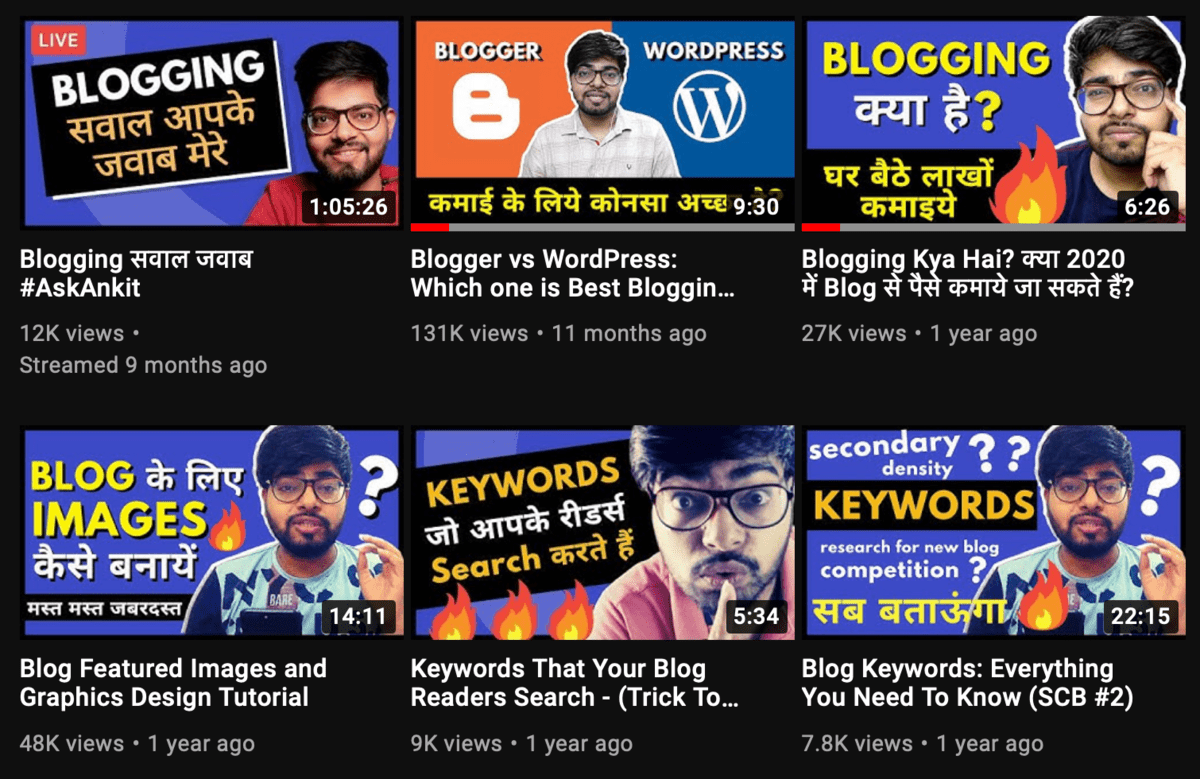
Here are a few examples of thumbnails that took minimal editing to be effective:
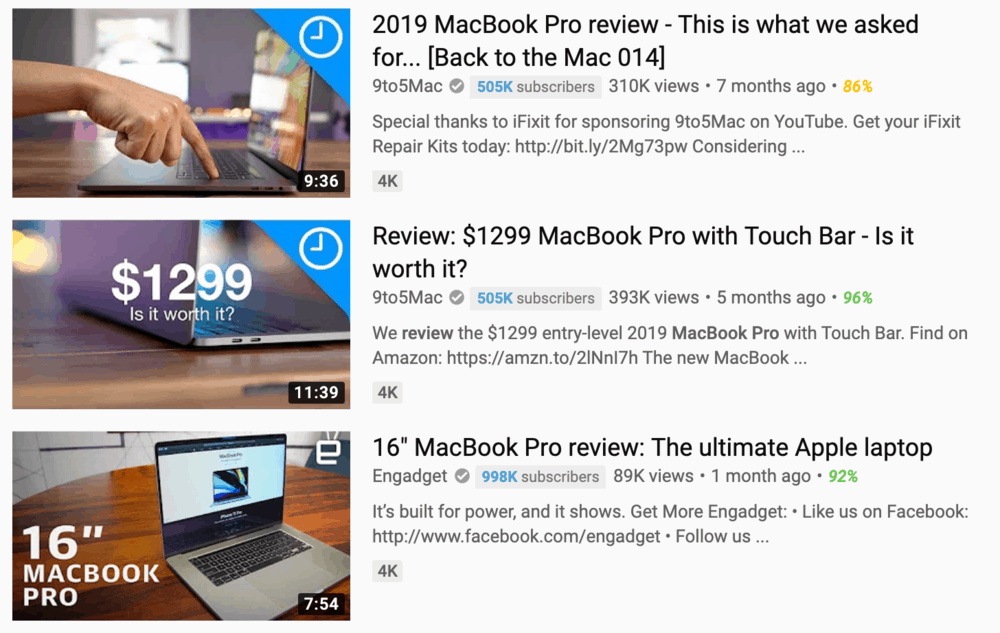
Although there’s no such thing as a one-size-fits-all blueprint for creating YouTube thumbnails, there are proven guidelines that generate results:
- Use a high-resolution image — at least 720p — with a 16:9 aspect ratio
- Keep the file 2MB or below in size
- While JPG and GIF images can work, stick to PNG images for sharper thumbnails
- Add text to make the thumbnail more clickable
- When reviewing or featuring products, use a close-up shot
- Find a consistent thumbnail style for branding purposes
9. Scheduling your YouTube video
If you’d rather schedule your video for a later time, expand the ‘Schedule’ menu from the ‘Visibility’ tab.
Here, you can define a specific date and time when you want the video to become public. Just choose the options you want from the drop-down menus and make sure you set the right time zone.

Why wait to publish your video when you could be getting views now?
If you know a thing or two about social media marketing, you’ll know that the timing of posts is important.
You don’t want to publish your video while your target viewers are offline.
True — they can probably still find and watch your video later. But, by then, there could be a handful of newer, similar videos that could steal their attention.
According to statistics, the best days to post on YouTube would be Thursdays and Fridays. Aim to upload around 12PM-4PM to have your videos indexed by evening, which is when users are most active.
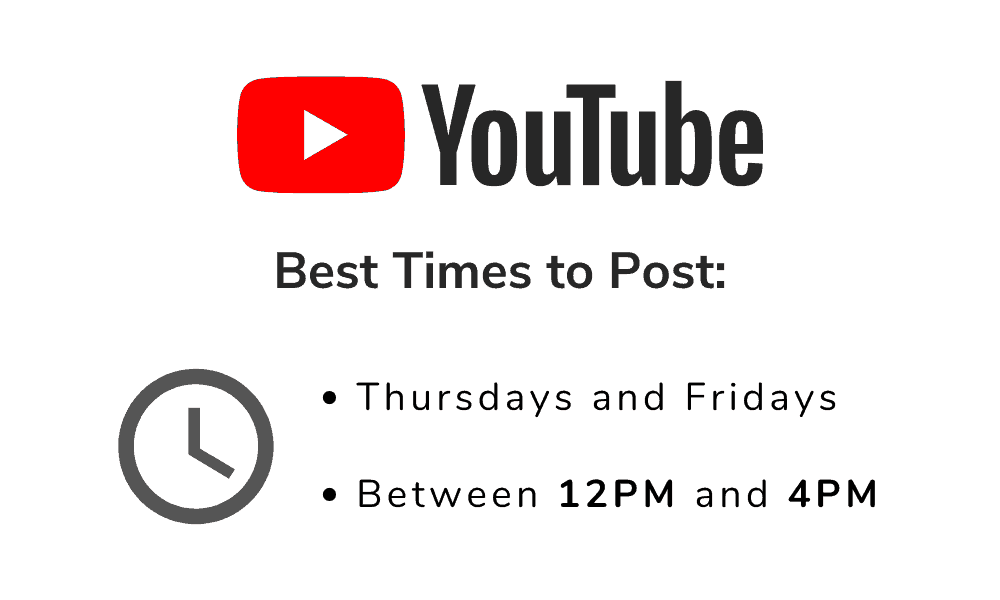
Weekends are also great days to publish videos on YouTube. Get them up as early as you can to cater to viewers throughout the day.
10. Creating playlists
Eventually, your YouTube channel will have enough videos for you to create playlists.
If you know about music streaming services, you’ll know exactly what YouTube playlists are for. They are for users who want to binge through related pieces of content.
On YouTube, playlists encourage viewers to see more of your content in one sitting. They also make sense if you have a list of videos that must be watched in sequence.
Below are a few more interesting things about YouTube playlists:
- Your playlist may contain videos uploaded by other YouTube channels.
- As the playlist’s owner, you can assign other users as “collaborators” who can add new videos to your playlist.
- Just like videos, playlists need keyword-optimized titles and descriptions.
You can create playlists from your YouTube Studio page or while configuring a new upload.
From the YouTube Studio dashboard, navigate to the ‘Playlists’ and click the ‘New Playlist’ button. It’s a simple process that only takes a few seconds to complete.
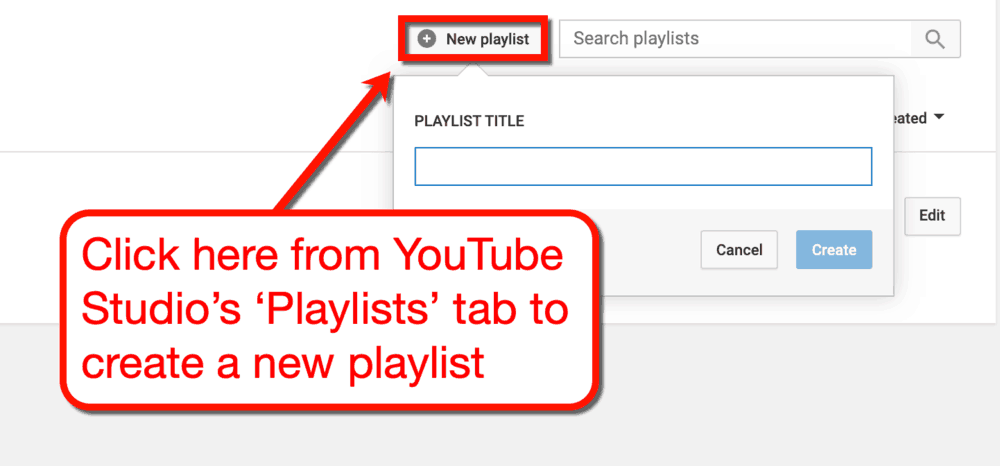
To add videos to your playlist, head to your account page and search for your playlist under the “Library” section. Next, click the ‘Add videos’ button next to the playlist you want to edit.
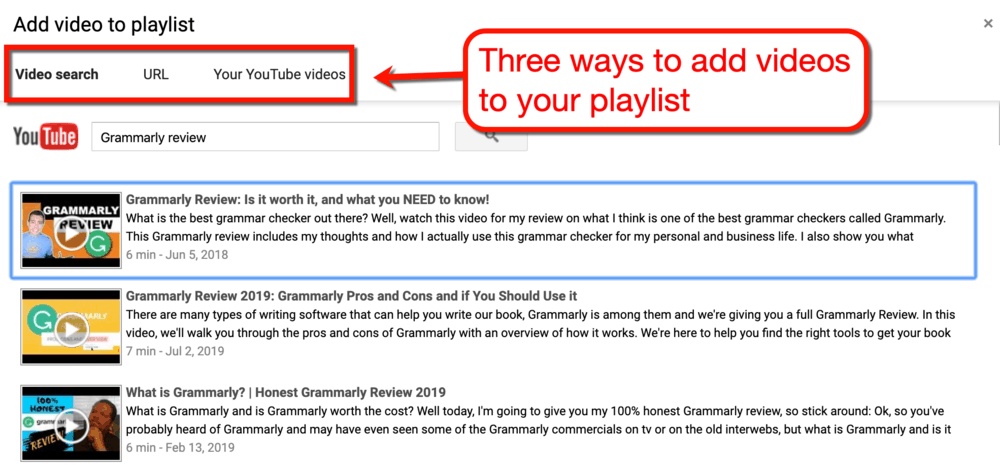
YouTube will then let you add videos by entering their URL, searching the site, or choosing your own videos.
Ways to Get More Views in Your YouTube Videos
Phew — we covered a lot of things on how to optimize your YouTube channel and publish videos like a champ.
However, you can’t relax just yet.
Building your YouTube channel and publishing videos are only half of the job.
The next challenge is developing your YouTube marketing promotion strategies and amassing a large audience base on the platform.
Let’s get started.
Share it across social media
The first thing most bloggers do after publishing a video is share it with their social media followers.
You don’t need to be an expert in social media marketing to know how to do this.
What you need to keep in mind, however, is to time your post right.
Just like YouTube viewers, social media users tend to be more active during specific times and days. Sprout Social already did the math and revealed the following times to be the most lucrative for social media networks:
- Facebook — Wednesday at 11AM and 1PM
- Twitter — Wednesday at 9PM, Friday at 9AM, and weekdays from 8AM to 4PM
- LinkedIn — Wednesday from 9AM to 10AM and 12PM, and Tuesday to Friday from 8AM to 2PM
To make sure you reach the right people when sharing your video, join relevant social media groups and promote there. Whatever you do, read the group’s rules and guidelines to make sure they allow promotions.
Promote your video in your blog
If your video’s script is modeled after an existing post in your blog, don’t forget to embed it there.
Trust me — your readers will thank you for it.
It’s a simple strategy that only requires a minute or less to do. In return, you can exponentially increase the perceived value of your blog content and the user experience.
If you made your video’s script from the ground up, consider writing an article around it. It doesn’t have to be as in-depth and comprehensive since most of the information should already be in the video.
Promote your video on Q&A websites
Promoting your blog on Q&A websites like Quora is a proven way to generate high-quality traffic and build your authority.
The idea is simple: find users who ask questions you can answer, and then promote your content as the solution.
I discussed everything you need to know in this guide on how to get traffic from Quora. The only extra step you need to add is to include a link to your YouTube video when answering questions.
Start interacting with your fans with video
As you continue to publish YouTube videos, you should get more and more confident speaking in front of a camera.
Keep the momentum going by interacting with your fans using video streaming. Leverage platforms like Instagram Live, Facebook My Day, and YouTube Live to share updates and tidbits of wisdom.
During your streams, encourage viewers to check out your YouTube channel for more video content.
More importantly, talk to them as if you’re having a friendly conversation and ask for their feedback.
If you’re streaming via platforms like Facebook Live, viewers can instantly share their opinions through the built-in chat. It’s free, easy to do, and can even be done straight from your mobile device.
Be more helpful in your video’s comments section
Think you already know everything about YouTube SEO?
Other than on-video factors like keywords, YouTube also takes into account “engagement factors” to determine a video’s relevance.
If you focus on putting up quality videos, engagement metrics like likes, views, and comments should naturally increase. Spur more engagement by constantly addressing your videos during your videos and telling them to share their feedback.
It will also help greatly if you respond to comments posted on your YouTube video. Show your appreciation to positive comments by clicking the “heart” icon to make them your favorite.
Even big YouTubers like Dave Lee respond to comments as if they’re like any other user.
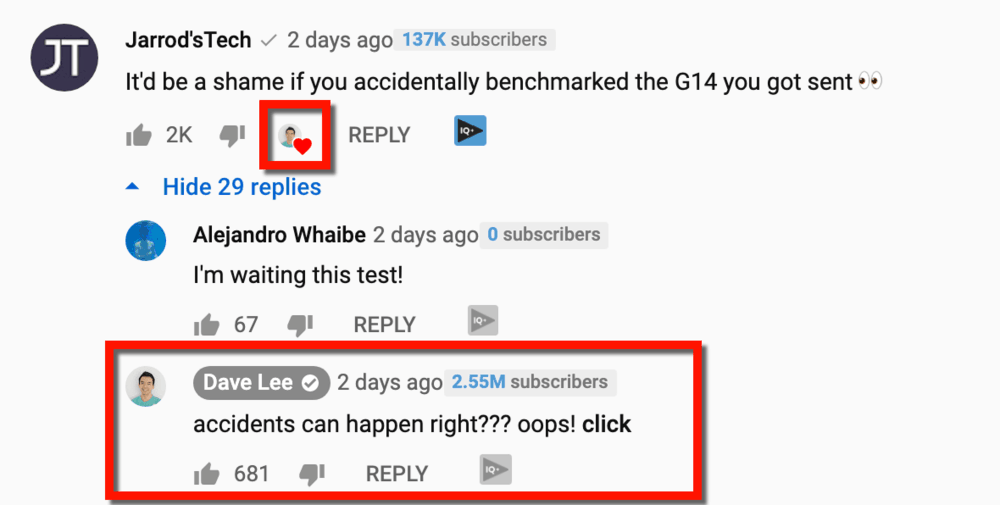
If you find comments that are particularly helpful, you can pin them to the top of the list. Just remember that there can only be one pinned comment at any given time on a YouTube video.
Keep tracking your progress
It doesn’t matter if you’re doing YouTube marketing, email marketing, SEO, or social media marketing. If you want to succeed in your endeavor, you need to learn how to adapt and adjust to changes.
Use every tool at your disposal, from vidIQ to Google Analytics, to track your channel’s growth. Keep testing strategies to determine what works and double down on it to maximize results.
I, myself, continue to invest time and effort to learn how to grow my own YouTube channel lately. I’ve been testing video ideas, applying different promotion tactics, and monitoring my results.
My most popular video of all time, for example, taught me the importance of keyword research and being relatable.

It also let me realize the importance of optimization tactics like tags, comprehensive descriptions, and user interaction.
If you visit the video today, you can verify that most of the things in vidIQ’s optimization checklist are present.
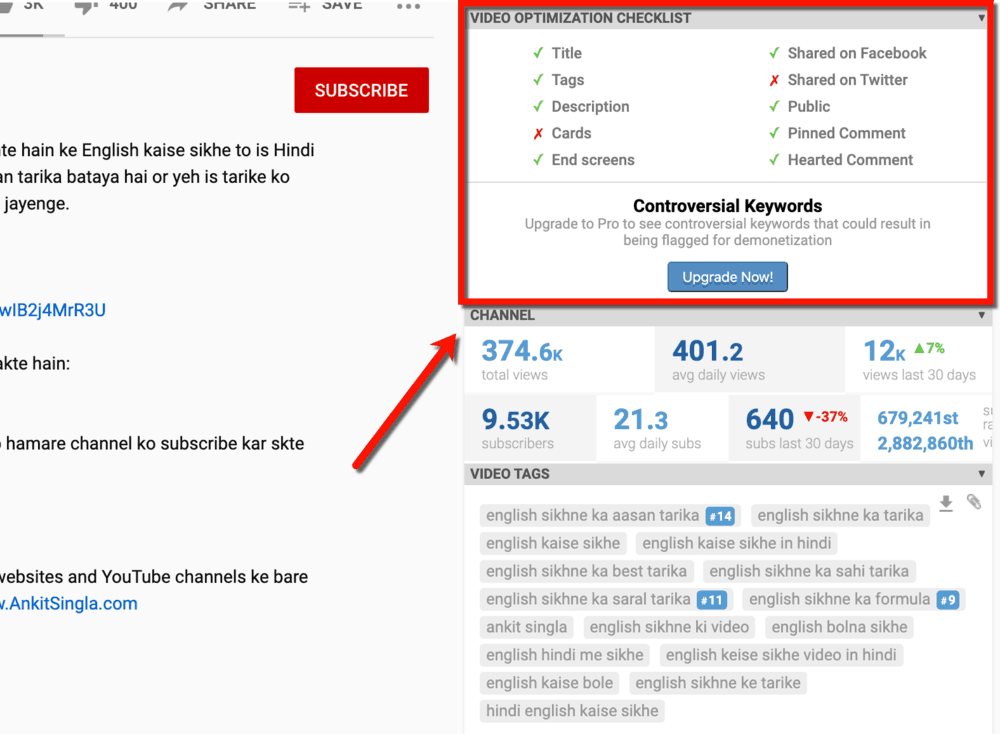
Sure, there’s still a lot of room for improvement. But as a blogger with a YouTube channel, knowing that all your hard work pays off is a big win.
Conclusion
Without a doubt, YouTube marketing is one of the biggest challenges a blogger will ever face.
It requires time, money, effort, and a ton of patience before you start seeing positive results. But when you do, a healthy YouTube channel can single-handedly propel your blog to the “authoritative brand” status.
I’m pretty sure that you won’t be able to do all of the things I’ve mentioned here in a single day. With that in mind, you’re welcome to bookmark this page and work at your own pace.
As a final note, I’d love to hear about your results using the strategies above. You’re more than welcome to use the comments section below for feedback, suggestions, or anything you’d like to share.
Good luck!
You Might Also Like:
- How to Promote Blog Posts: 17 Easy-Peasy Ways that Cost Nothing
- 5 Ways to Recycle Old Content and Bring Them Back to Life
- Best Blogging Resources (Books, Tools, Courses, and More!)
For More Go to : Master Blogging
No comments